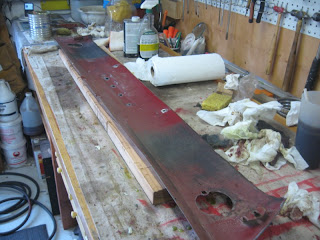
The license plate support bracket was twisted in the original impact, which must have been severe enough to bust the right side spot weld. Simply hammering it back into shape would have been very difficult if not impossible, so I decided to remove the bracket from the valance, straighten it out, and then weld* it back on.
The first step was to support the valence between two scrap 2x4's....
....and drill out the three remaining spot welds - which I accomplished with my new Eastwood spot weld cutter. I've read that some people drill an eighth inch pilot hole to guide the spot weld cutter, but I found making a mark with a center punch was good enough.
The photo below shoes how bent up the bracket was before I worked my magic.
Five minutes with a slab of metal plate and a body hammer, followed by grinding off the old spot welds with a three inch sanding disc on my die grinder, and the bracket was much straighter.
The valance was covered in minor dings and there were a few areas where the paint had bubbled up, mainly below the tail light mounting holes. I'm guessing that rain water gets inside the tail lights and takes a while to seep out leading to minor corrosion. I decided at this point to strip all the old paint off the valance before I welded the support bracket back on. I started with a can of standard paint stripper I had on the shelf in the garage. I've had a ton of experience of stripping paint off wood over the years, but this was completely different. The stripper really only made an impression in places where the paint was already peeling; scrubbing at the surface with a scotchbrite helped a little bit, but it was too much like hard work to do the whole valance that way...
...so I went to the local parts store and picked up a can of aircraft stripper. This stuff is expensive, but If I knew how well it was going to work I would have bought a bigger can - there will be a lot more stripping to do on this project in the future.
Starting at the left side of the valance this time I laid on a thick coating of stripper, left it for ten minutes or so, and then went over it with a body filler spreader. Most of the paint (and primer!) came off after the first application.
The stripper was a bright green color and the fumes were pretty awful, but it did work really well, so I'm not complaining.
After I was done with the stripper I cleaned up with Simple Green and some shop towels. The valance came out really nice, even if I do say so myself.
The inside was even easier to strip, as Ford only applied primer to this side, and some of that had already been eroded.
Once the inside was cleaned up it was time to get the body hammer back out.
This was reasonable easy to fix, and I think I did a good job of getting the valance to look the same as the undamaged area at the other side.
The lower edge was deformed most of the way along from a multitude of impacts over the years, but fortunately the metal wasn't torn or cracked so it was relatively easy to straighten it out.
There. Not quite perfect, but as good as I can get it without using body filler. I probably will use some filler later on, but due to the flexible nature of the valance, I think applying filler and sanding will be easier once the valance is back on the car.
The next step is to plug weld the bracket back on to the valance, and then give it a coat of red oxide epoxy primer before I mount it back on the car in preparation for the body filler marathon that is currently in the distant future. For now, the two pieces are going in the "need to weld*" pile.
(*I'm hoping that Santa Claus is going to bring me a MIG welder).
Update 2011-01
It's been a few weeks since I worked on the rear valance, so I started off by wet sanding to 120 grit on the outside - this gave a nice shinny finish all ready for primer.
Then I clamped the license plate support in place...well, that's what I wanted to do, but I don't have any clamps or vice grips big enough! So I used some masking tape to align the support instead...(note to self: buy some decent clamps!!)
And then I wedged the support against the edge of the workbench and clamped the valance to the bench. Hardly the ideal set up, but it was just about good enough to hold the support where I wanted it while I laid down a couple of very small tack welds.
 |
| The tack welds destroyed the tape - not a pleasant smell! |
Then, using a piece of copper as a heat sink, and a wooden wedge, I was able to properly weld the support to the valance one plug at a time. Far from a perfect solution, but it worked without burning holes through the support bracket.
 |
| Not too bad, for a MIG novice |
 |
| Cleaned up on the outside... |
 |
| ...and on the inside and now all ready for epoxy |


It looks like new!! I'm just floored by the excellent results you got from your chemical stripper. I thought all strippers would be similar but now I see that's not true at all. I got the wrong stuff, evidentally. Nice work!
ReplyDelete