Tuesday, September 30, 2014

and now for more of the same

If one huge construction project wasn't a good enough excuse for not working on the car, then how about a second? The upper level deck and stairs at the back of the house have been on the "must be replaced" list for five years I think, and this summer an opportunity arose to finally take the bull by the horns. Funny thing is, we were so eager to get on with the demolition, that I forgot to take a decent "before" photo. By the time I got the camera out, we had already removed half of the top platform. It took all of the first day just to demo the top platform and remove the stairs. The two 6"x6" posts are in good shape and will be staying. I'll also be re-using the stringers. Everything else will be going!


So far, so dry rot. This is where the project took a left turn. After we got the stairs out of the way, it was immediately apparent we had a dry rot problem in the siding. The trouble is, once you peel off a bit of rotten material, there always seems to be another piece underneath. About an hour later, thanks to a crowbar I picked up at one of the Turlock Swap Meets, and there was a big heap of broken up, siding in the yard.


Add to that, several partially rotten wall studs, and I was starting to think I may have bitten off more than I could chew.

Oh dear!

I was lucky in a way, because the lower door was installed relatively recently, and the laminated header was in good shape. I couldn't say the same about either of the corner wall studs, or several of those in the center, and they all had to be partially replaced and/or sistered. I ended up ripping off a lot of siding until I had decent material above and below.


I had some help with installing the tar paper and the replacement siding, but all-in-all this was a lot of work I had not bargained for when I began tearing down the stairs...and it put the project severely behind schedule.


So, finally back to working on the deck. After ripping out the mid-level platform, I started constructing the replacement. All the timber that is seen, and the entire upper level deck will be constructed from new pressure treated lumber, but I used some recycled material for the supporting structure at the  mid-level platform. All the upward-facing edges were covered with tar paper to prevent dry rot and/or fungus damage. This time around a proper flashing was also fitted at the junction with the house.


The upper level deck is supported by the pre-existing 6"x6" posts and securely anchored to the house with a bunch of 6" lag bolts. I'm never happy with anything I build unless it's 1000% over engineered...


After completing the framing and supporting structure I re-installed the three stringers between the two platforms. Getting the stringers secure and absolutely square took a little time.


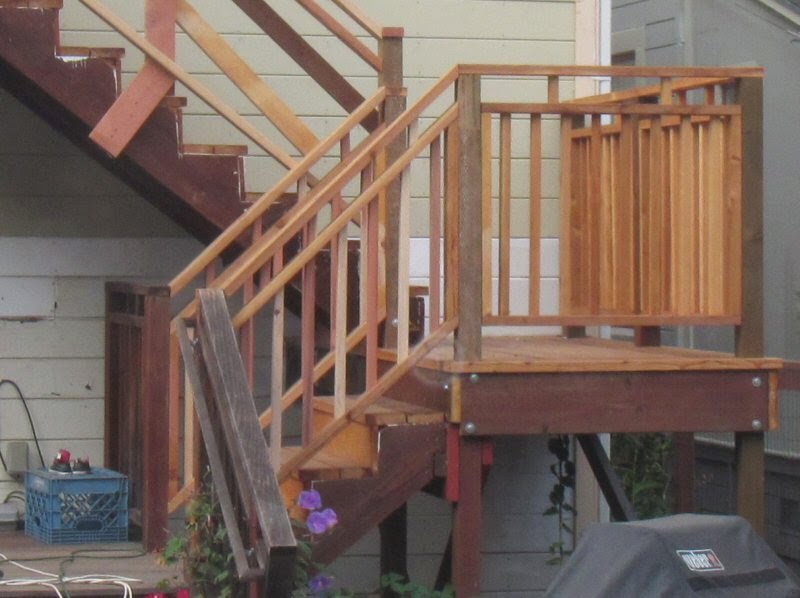
Next....a trip to buy a huge pile of lumber on the friday night before a three-day weekend.  I picked up some redwood fence panels for the risers; the treads and deck boards will be cut from 2"x6" redwood lumber. The perimeter railings and handrails will be made out of 2"x4" redwood with standard 5/4" pickets.


Started by installing the risers and treads at the lower few stairs.


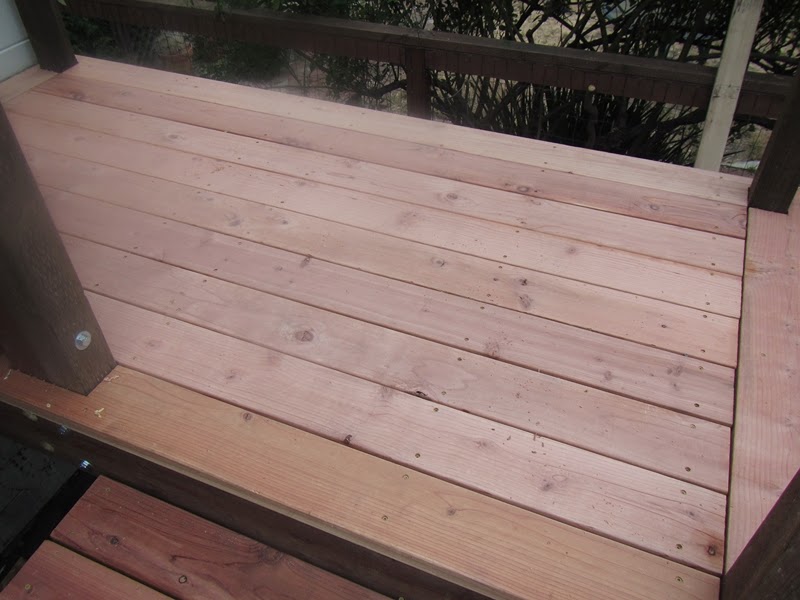
Continued with the deck boards at the mid-level platform. This was the most enjoyable part of the project - the bit everyone will look at.


Moved on to the upper set of stairs and the top deck. 


As the sun was going down on the sunday night I was still busy putting up some safety railings and handrails.


Next time out I worked on building the straight sections of the railings and handrails.


The angled sections of the railings at the sides on the stairs were a little bit more challenging but this was also a lot of fun.


The very last thing was the stringer covers - I installed two sections of 2"x12" PT lumber to improve the aesthetics. A few stray end-grains were also stained to match the pressure treated lumber. Have to say I'm very proud of this project....but now it's back to the '68. And about time too....

Tuesday, September 16, 2014

and now for something completely different...

I said that my last post had taken three years to accomplish, and since then....nothing! It's true. My shinny red 351W is sitting in exactly the same place it was the day the freeze plugs were installed. And here's why: I've been otherwise occupied with constructing my new workshop. It's at the back of the yard, so its not likely I'll ever be using it to work on the '68...but you never know.

A few months ahead of time we had a 12'x17' pad of crushed granite installed at the end of the yard. We laid down the foundation skids - five 16' lengths of 4"x4" pressure treated lumber - on top of the pad. Getting everything level took a bit of back and forth...


The floor joists were laid on top of the skids. We used 2"x6" doug fir for the floor joists and installed 3/4" plywood sheets on top to make the floor. This made a very sturdy platform for the shed. And that was it for the first weekend.


The front and rear walls were framed from 2"x 4" doug fir with OSB sheeting at the exterior. We built the walls on top the floor. I used a double top plate to ensure the structure is as robust as possible.


I would have liked to raise the walls exactly as they were built, but we could only manage to lift them in sections.


A lot of time was spent making sure everything was absolutely square, square, square.


The framing for the side walls was added after the front and rear walls were erected.


Installed the door and attached OSB sheeting around the opening.


Several weekends in and it was time to make the rafters. I used some pipe clamps to hold the 12' sections of 2"x4" doug fir together so that they could all be cut at the same time. I cut the notches with a mixture of the circular saw and my router, and cleaned up with a very sharp chisel.


Installed the rafters...


Added more OSB sheeting for the base of the roof...


Framed out and sheeted the triangular sections at the top of both side walls and hung the door.


Starting to look like a shed....after about four solid weekends of work!


This is where it starts to get interesting. I'll be honest, I've built tons of stuff out of lumber before...but I'd never rolled on a roof. Well I have now. I used standard yard-wide rolls of roofing material and a huge bucket of tar. The three-knot brush they sell at home depot is crap I'm sad to say, but I made the best of it.


A few weeks (or was it months?) after the roof was installed, I trimmed the perimeter and installed the flashings. All exposed nailheads at the flashings were sealed with silicon. It wont win any prizes for neatness, but hopefully it will at least be water tight. If it ever rains in California again!


After the roof was on, we spent a while blocking out the underside of the roof and the interior walls. These are the un-sexy parts of the project that you have to do make the structure secure.


Installed the very latest in building wrap. I really like the idea of this material. To be frank, it's overkill for a regular a garden shed....but for my new workshop it's a case of no expense spared!


There was a hiatus of several weeks after the wrap was installed. Everyone has to have a vacation, right? And there was the annual trip to Reno for Hot August Nights. When work resumed, it was time to install the exterior sheeting. We used treated plywood at the sides and rear - these walls will hardly be seen after all.


The front wall got some good quality ship-lap siding. I would have liked to put this on all four sides, but the price was prohibitive.


Installed the trim around what will eventually be transom windows at all four sides and primed the exterior. Then there was a phase of figuring out exactly what color paint to use.


Decided on green with darker green on the trim and a complimentary blue hue for the door.


Finally somewhere to stall all the bikes!! I'll be installing the windows and bringing electricity to the shed.....in the Spring.