Monday, October 19, 2015

Mustangs Plus 2015

It's been a while since I've been out to the Mustangs Plus show, but this weekend I set the alarm for 4:30 am (!) and joined up with the BAMA guys for the trek out to Stockton.

Pit stop in Tracy and still not day time...

Mustangs Plus is all about getting there early in order to snag one of the better parking spaces, so for the last few years the BAMA folks have been leaving earlier and earlier....and it hasn't helped, because everyone else has been doing the same. Fortunately, this year someone in the club managed to pull a few strings with Ron Bramlett and we got a bunch of spaces together very close to the front (and Ron's mic...).


Among the vendors at the show was longtime friend of BAMA and eight times SCCA National Autocross Champion Mike Maier and the crew from Mike Maier Inc in Livermore. (Formerly part of Maier Racing Enterprises in Hayward). Mike recently filmed the clip below with the guys from Ford Racing.

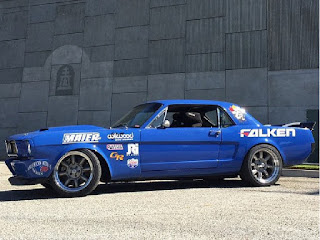
Mike Maier's "old blue" 66 coupe

This lime green (in my langugue) MACH 1 was a personal favorite. I like the out-of-the-ordinary stuff.


It's Mustangs Plus and that means there are always some unusual cars at the show including this very rare 70 cyclone and a cool fairlain.


Plus the usual selection of  what I guess are now mid-period cars.


Even the USPS tried to "muscle" in on the action!

Friday, October 9, 2015

now we're talkin'

Finally back to work in my new garage, and it feels great! In the last three garages, I've installed fluorescent lighting, but this time I wanted something more portable. I ended up with this LED tripod light from Northern Tool. The tripod is on the flimsy side, but it's fine for what I need and I get more than enough photons wherever I want them. I can see myself using this light (or one like it) for a lot of future projects.

Perfect working conditions :)

Right now I'm concentrating on getting the 68 running again as soon as possible - I want to take it to some BAMA events before the car goes for paint - so I've skipped over a few things that I'll have to come back to later.  One of those was the driveshaft, which I acquired used from my good friends at CP Designs. Normally I would have taken the time to paint it gray to match the rear differential housing, but I don't have anywhere I can use as a paint booth right now. Plus it's not exactly the most difficult part to remove later. The optimum length of the driveshaft with the T5/8 inch rear end is 52 ½ inches from the tail housing seal to the center of the u-joint at the pinion of the differential. I had to buy appropriate U-bolts because the originals were designed for the six cylinder rear end.


Around the time I installed my SSBC brake setup and new brake lines, I also installed the wider bore ⅜ fuel line I'll need for the V8. The only problem with this, apart from some of my amateurish bends, was that I directed the fuel line to the original location - or in other words, to where the fuel ump used to be when the car had a six cylinder engine. Oops! Rookie error! I'm not sure how long it would have taken me to figure this out if one of my friends hadn't noticed.

Six cylinder location at steering box

I had to take the fender off to get at the incorrect fuel line, and while I was thinking about how to make a replacement piece, and whether my custom drilled mounting holes in the frame rail would still be usable, I found myself drifting off in a completely different direction.....

Looks nice, but still incorrect

The steering box: back when the 68 was actually running, the steering was as sloppy as a soup sandwich. On a hot day. I'd always planned on figuring out a rebuilt or replacement box closer to the end of the project, but for the purpose of moving the car around I had re-installed the original part. And so, as I was staring down at the misdirected fuel line, I realized the time had come to deal with the steering box - apart from anything else, it was in danger of becoming seriously inaccessible as the engine compartment filled up.

The options for a steering boil down to:
  1. Rebuilding the existing box
  2. Buying a rebuilt box from NPD and using the original as a core to obtain a discount
  3. Buying a after market steering box
  4. Upgrading to power steering
  5. Going for a full-on upgrade to electric power steering as some other folks in BAMA have done.
I pretty quickly came to the conclusion that a rebuild is best left to a specialist, and I'm not planning any power assists to start with, so it really comes down to either #2 or #3. After shopping around the various mustang parts houses I managed to find a Flaming River aftermarket box for less that $500 from Mustangs Unlimited, including free shipping. This is about $50 more than it would cost to buy a rebuilt box from NPD and pay to ship them the core. The flaming river steering box is on the left in the picture below. I decided not to paint it gray like I did the original.

Here is is in situ

After the steering box was installed, I moved on the the instrument cluster which I wrote about a couple of weeks ago. I had to loose the heater control panel and add the dash pad before the cluster could be eased into place. I'm really happy with the (very slightly) customized look.


Next I popped in the chrome-plated export brace that I picked up on a visit to Turlock in 2011 and have been storing in various attic spaces for the last four years. I say "popped in" but in truth it was quite a fight. For a start, installation necessitated removal of the shocks and for another it did not line up exactly right - although it was a lot nearer now the engine is back in place. I basically forced it into position by getting some of the bolts started and pulling the chassis into alignment as the bolts were cranked down. Another job done!

Monday, October 5, 2015

interior round-up

Most of the work described in this post was done at the old garage in preparation for the move - essentially I had to put the seats back in before I could move, and while I'll have to take them back out at some point to restore them (and install the carpet), I wanted to make sure all the surrounding areas were buttoned up.

Now then, now then: if you're going to drive around in a vintage car, then you have to accept some compromises on safety. I'm fortunate that 68 was the first year that ford replaced the "spear" steering column with a collapsible design and made a number of other modifications to improve safety, such as the rear side marker lights. In addition I've made my own improvements such as the SSBC brakes and 3-point seat belts (see below).

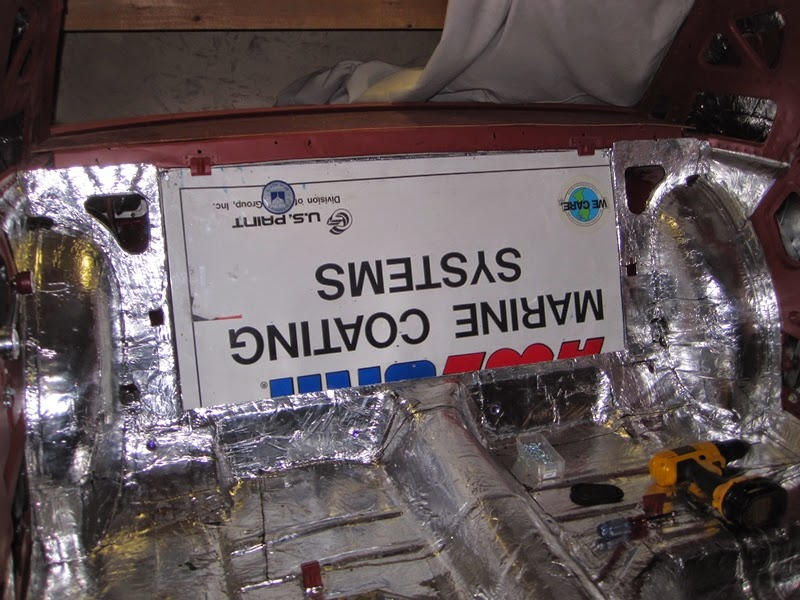
Given what we know about gasoline, it's always surprised me that the gas tank (also known as the trunk floor) is separated from the passenger compartment by nothing more than a flimsy sheet of cardboard and the rear seat back. A common modification among the guys in BAMA is to install a steel or aluminum sheet instead. I followed this path after my buddy Chuck acquired a suitable obsolete steel sign, which I trimmed, covered with faux-dynamat at the trunk side, and installed with sheet metal screws.

Much safer!

Absolutely forever ago (when I had the old garage set up as a paint booth) the rear seat side panels were stripped down, and repainted. I had to remove some light surface rust on the inside, and I scrubbed off all the remnants of the old foam sound insulation.


After painting, thick foam insulation was glued onto the insides of the panels with the 3M yellow weatherstrip adhesive (but not photographed) and the Kraft vapor barriers installed using windshield caulk to provide a seal. To be honest it was really hard to squirt sticky black paste over my beautiful car...but I found a way. After the panels were installed I attached the window winders, and tested the quarter windows....and applied my BAMA decal in the passenger quarter window.


Another improved safety feature of the 68 over the earlier cars was shoulder belts as well as lap belts for the front seats. This means that installing 3-point seat belts in a 68 is a good deal easier than in the preceding cars because the upper mounting point is already there. I actually purchased the seat belt kit more than two years ago, because I wanted to test all the mounting points before I put away the welder.


After I Moved to the present garage I found the seat belts while looking for something else, so I took ten minutes out to installed them. The lap belts in the rear seat are for show. This will be a two-seater car when it's on the road.

Monday, September 28, 2015

cleaning up the cluster

I haven't spent much time on 68 lately, but when opportunities have arisen I've been chipping away at some of the smaller projects I started back before the latest garage move. The instrument cluster worked fine (in 2009...) but I wanted to smarten it up a bit. I know most people replace the stock gauges with something more modern, but I decided to keep mine stock, while doing some subtle customization.

Started by dismantling the cover. The fluorescent paint on the speedo was sun-faded, so I started by taping-off this area and applying some of the special paint I bought from NPD (with a Q-tip, natch).


I very delicately "clocked" the speedo back to zero, hopefully without breaking it (!)


The worn "camera case" bezel was dismantled and re-painted with the same black Sign Painters 1-shot lettering enamel that I used on the heater control panel.


The gauge trim rings were painted with the ford maroon paint that has been used throughout the interior (this was done forever ago....)


I tried to polish up the original lenses, but I couldn't make any impact on the now-crusty plastic. I ended up buying a scott-drake repro set through my buddies at Mostly Mustangs.


Installed the appropriate segment of the replacement wiring harness. 


Very happy with the finished look:

Tuesday, July 7, 2015

time to saddle up and ship out


Good grief, it's been nearly six months! Again! And it's been six months without lifting a wrench in anger. Here's the story: A few days after we dropped in the engine, it was time to move house again, and part of that was packing up the garage. This was a task that took quite a while. As well as crating up all the tools and parts I had to take down all the shelves and empty out the benches and drawers ready for transport.


My high school buddy Martin was in town the day we moved the car to its new home. The tires could have done with some air, but otherwise it was straight forward thanks to Mark at Junebugs.

Moving all this was much tougher....

With a new house to organize, not much happened in the garage for quite a while after the move. I eventually got the work space organized in June 2015.

Scene of much work I hope...

A week later it was finally time to work on the car again. Started by installing the radiator.


Installed and torqued down the aluminum intake manifold....


....and popped on the water pump.


To be continued.....