Showing posts with label lights. Show all posts

Friday, June 27, 2014

waiting for the heads

OMG It's been FOUR months! There have been a number of "down" periods on this project - and many more periods of intensive work - but that last few months have been somewhere in-between: short bursts of work punctuated by longer periods of...nothing. Oh well...

At the end of my last post I found myself unexpectedly in need of a valve job and without a machine shop. There are ways to find these things I guess (like the interwebs), but, as mentioned countless times already in this blog, I like to start by asking the guys in BAMA when I need something. What was unusual about this time around was that instead of finding a machine shop, I found a specialist head builder that was already in the club! In fact, the owner of Heads by Steve in San Ramon has decades of experience building heads, many have which have been run in NASCAR teams.

So I cut a deal with Steve to do the valve job, install 7/16 inch screw-in studs, and port match the heads to the gaskets and the intake manifold. When the heads came back a few weeks later they were just....well....immaculate.


And the ports were just so smooth, I could see the increase in power!


While the heads were away, I was marooned at home, surround by lots of boxes filled with shinny new engine parts. This spurred me on to crank through some of the half- and three-quarter-finished mini projects I'd previously abandoned. The first one was the tail lights and trunk wiring harness, which I couldn't face after the painful process I endured below the dash. The tail light buckets were refurbed, and painted brake gray (outside) and brilliant white (inside) back in the Green Room days.


The concave tail lights were the feature that first attracted me to the 67/68 cars in the first place. I acquired a bunch of extra OEM trim pieces from my buddies up the Street at Mostly Mustangs and picked out the best six pieces. I replaced the rubber pads, although attempting the glue the new pads to the trim pieces with weatherstrip adhesive was an abject failure. The studs and nuts were zinc plated way back when...


The tail light connectors were, of course, not included in the Pathetic Painless wiring harness, so I adapted the originals. I did the same with the back up lights. And the fuel tank sender connector....and most of the stuff in the engine compartment too no doubt. The Pitiful Painless harness was actually too short to reach both tail lights, so I did a bunch of chopping and joining of wires that I would rather not have had to do. In the middle I ran out of the wire connectors supplied in the P...p...p...FUCKING AWFUL Painless kit, and had to run to Home Depot. Grrrr!!


I also completed installing the Dynamat in the passenger compartment and taped the joints. Long-overdue!


Next time: Engine Rebuild. I mean it this time!!


Thursday, January 2, 2014

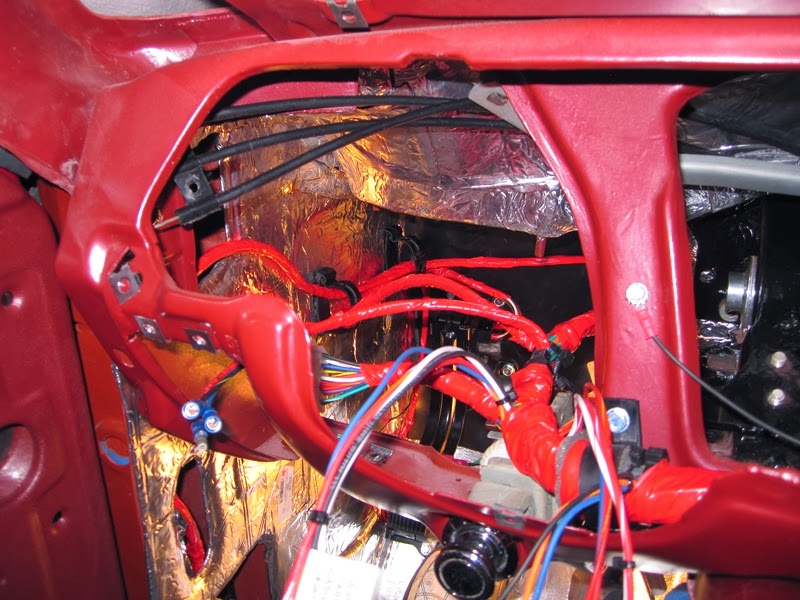
the Painful wiring harness

I think I always knew that I would end up buying a completely new wiring harness for the '68. The fact that it sucks so much more $$$ into a pretty deep black hole meant that I considered making my own, and I was in fact encouraged to do so by a couple of the guys from Vic Hubbard....but in the end I decided to lay down for a new one. The choice came down to the overly-hyped Painless kit for $$$ or the OEM harness that NPD sells for about 30% more $$$. In the end I went with the advertising and splashed out on the Painless kit. I'm not sure this was the correct decision (some aspects of the installation are decidedly Painful!), but at least it was the (slightly) cheaper option.

Seems a lot of $$$ for what you actually get

I started by laying the new harness out on the floor next to the old one. It seemed to be similar, but it was also clear that I was going to have some work to do with my crimping tool and the box of connectors that came in the kit.


Laying the harness in the space behind the dash is straightforward, and the kit includes two correctly sized grommets which facilitate smooth passage of the engine compartment loom through the firewall.


The first thing to do is to secure the fuse box in the stock location. The shape of the fuse box is different to the original, so installation requires drilling two new holes in the firewall. Suitable sheet metal screws and included in the kit. When I was happy with the location of the fuse box, I dug out my replacement firewall pad and installed that too (you can see the pad in some of the later photos). The original pad was actually in pretty good shape, so I hung onto it and used it as a template - the reproduction pad requires a few adjustments - but it was nice to throw it away.


The kit comes with a decent instruction manual, and each individual wire is labeled and color coded which helps a lot with the basic layout...but it's difficult to make specific connections without something to connect to. So the wiring installation quickly expanded to include most of the under-dash components too. The first item was the windshield wiper motor operating arms, wiper motor and mounting bracket. The motor casing was restored at the same time as the heater motor and finished in Eastwood brake gray. The mounting bracket got the black Dupli-Color. Mounting hardware was zinc plated...about two years ago.


Next up: the heater, plenum chamber and defrost hoses. Installing the heater through the firewall (and the pad) is a simple operation with two people...and a triumph of desire over gravity on your own. As usual I took the latter route. I think my general method of doing stuff the hard way is driven by the feeling of accomplishment I get on completion.


The kit is designed to fit in the stock wiring location(s), which means the heater motor connection looks like the picture below (albeit without any sleeving on the wires). It's been so long since my car had any wiring installed that I'd forgotten how messy this looks. I certainly couldn't leave it like this. At this point the wiring harness was only loosely installed, so there was enough wiggle room for me to relocate the wire to a small hole I drilled in the firewall at the other side of the heater motor. I also used a cable clamp which I attached to the firewall with the lower heater attaching bolts. I also put some heat shirk sleeving on the wires. The only downside to this little operation was that I had to take the heater out before I could move the wire....so I got to do that tricky solo-heater-install twice.

I like my version better

After the heater was installed re-installed, I connected the control cables and carefully snaked them between the heater case and windshield wiper motor. I took a lot of photos of the under-dash area before and during the tear down, so it was easy to get the cables into the stock location.


The heater control panel was refinished by hand with some Sign Painters 1-shot lettering enamel that I got from Eastwood. The other bits were zinc plated. I also re-painted the letters on the control keys.


Next to go back was the ignition switch, headlight switch and the ashtray/cigarette lighter. I'll be doing some custom wiring in the glovebox later on for my cutout switch and USB connections, but I also want to have the stock look where the original lighter is functional.

I'm loving my zinc plated lighter surround

Once all this stuff was in situ, I felt confident that I could tie down the precise location of the harness and start making some of the connections. I was really expecting my expensive wiring harness to be plug and play, but in fact it was far from it. For a start the steering column connector bares little semblance to the original, necessitating the use of an additional connector and the original plastic connectors. Which is fine if your stock parts are reusable.....and fortunately mine were. Same goes for the connectors for the door jamb dome light switches and the cigarette lighter connection.


The other thing missing from the Painful kit is any form of alignment plugs like the original Bakelite fittings.


This leads to a lot of connections that look like the one below. I can't help feeling that the OEM style connectors are more robust.


Installing a wiring harness is always going to be a time consuming part of the project, and I really made sure I did take my time. Once all the important connections were made and I was completely happy with the location of the harness I completed the installation of the hanging brackets and cable clips. I also wrapped each section of the harness with scotch tape to add stability. This process involved a certain amount of disconnecting wiring and the removal of some items, although fortunately not the heater box. This was actually one of the most enjoyable parts of the project so far. I love re-assembly!

Time consuming but fun

The ventilation duct was another very difficult install

The wiring below the dash is not complete, but I've gone as far as I can for now. I still have the trunk area and of course the engine compartment to do. I'm currently looking at custom layouts for the latter.


At some point during the wiring install I got fed up of dropping tools through the openings in the floor pans. I taped over these once before, but this time I just re-installed the floor plugs. I know these holes are not for drainage, because they are not located at the low points in the floor pan...not to mention that they are also both too big and they are sealed up. I've heard a suggestion that they are alignment holes for use at some point in the body building process, which sounds more likely. Any other suggestions are welcome.

Monday, July 4, 2011

getting started on the turn signal hood

It has been a while since I last worked on my car - so long in fact that I found time to look through some of the pictures I took that haven't previously made it into my blog. The story of the turn signal hood is one mini-project which was thus "unearthed."

Around the turn of the year I acquired the rights to a rare example of the 67-68 Turn Signal Hood from one of the guys in BAMA. My understanding is that these hoods were part of the GT options package, and while that may be wrong - lmk if you know better - what is certain is that original examples of this particular hood are highly sought after. I mean repros are available, but we all know what that means in terms of quality, and when you look at the shipping charges, it becomes an expensive item.

I didn't actually need to replace my stock hood - like the rest of my sheet metal it's in great condition - and I hadn't even thought about doing so until one afternoon last August when I went over to my friend Larry's place to borrow a paint gun. While we were talkin' cars, and, as you do, picking through the piles of Mustang parts scattered about, I noticed a bunch of hoods leaning against the fence: there were actually two turn signal hoods in the stack. At the time my mindset was nowhere near taking on this kind of project, so I didn't think much about it...but after a few weeks of pondering, and reading this post from Alex, I knew I had to have one of the hoods for my car, and a few weeks later I did.


The hood actually came from a 67 fastback that has been mostly transformed into an Eleanor clone. When I acquired it, both louvers and housings were intact plus the original wiring harness - and both bulbs, but at the time I was also in the middle of another phase of the project...so the hood just sat in the corner of my old garage...


And that's how it stayed for a while, just leaning up against the wall in my old garage...but I just couldn't resist tinkering with it a little bit, so I started by taking off the louvers, which requires undoing seven stud nuts per side, and the turn signal lenses slide out at the same time - you can't see this in the picture below because of the dirt, but both sides have orange perspex windows.


This activity left the hood ready for paint stripper...and that was too much work to just dive into, so I found a place to store the hood out of the way and returned to working on the inside of the car.


But the louvers were still on my bench. Cleaning them up actually made a perfect evening project as it didn't require generating any noise. I started by dismantling the flasher units: the plastic cover is held to the housing with two small screws and there is a gasket in between - in this case the gasket that has definitely seen better days...


The grill at the front is held to the housing with four very small rectangular tabs - you can't really call them nuts - that I had great difficulty in removing. I finally got them off by the destruction method...something else to add to the "parts needed" list!


After cleaning with some soapy water the parts came out quite nice, but the white paint was cracked and chipped around the edges so I reached again for the aircraft stripper.


Underneath the white was a layer of greenish paint, could be the original color for all I know, and then under that the usual Ford gray primer.


The primer was mostly too tough to remove with the aircraft stripper, so I got as much of it off as I possibly could...


...and then finished up by wet sanding with some 120 grit paper...there, nice and shinny and all ready for primer.


While I had the paint gun out I gave the hood parts a couple of coats of epoxy primer and hung them up to dry. A few days later they were ready to be packed away for the foreseeable future. Something tells me the hood itself will be a much tougher proposition.

Friday, March 26, 2010

lights and electrical

When I took the back up lamps off, the housing was filled with forty years worth of dirt and grit. Somewhere under there is a lamp housing!


Like everything else on the car, the exterior housing was covered with red over-spray.


After a bit of work with the wire wool, I was able to get a real nice shine on the lamps.


I am packing all my cleaned up parts into boxes for reassembly sometime in the future.


The housing on the front marker lights was in real bad shape: covered in rust and splattered with something that looks like tar.


I may be able to clean up the housing brackets with media blasting....but will probably end up getting some replacements in better shape. We'll see what happens.


Although the car is a Sprint Promotion A model, it did not come from the factory with GT fog lamps - these are recently installed repros which I may swap for the OEM amber bulbs when I rebuild.


Plug connectors for the fog lamps were squeezed through an adjusted gap in the grille. A few other minor modifications have been made to the grille to accommodate the support brackets, but since I will be putting the fog lamps back anyway it doesn't matter.


There was an incredible amount of grot in the areas behind the headlamps. I am hoping to have the car torn down and the body washed before I got to the INDY 500 at the end of May.


As with so many other things, the retaining rings in front of the headlamps were covered with over-spray.


It is vitally important to properly label all the electrical connectors, even if you are planning to use a replacement wiring harness.