The Bay Area Mustang Association (BAMA) held our tenth annual Ponies & Snakes car show and charity fundraiser on Sunday June 27. Thanks to everyone who came to the show, provided sponsorship, or worked so hard to make the show such a HUGE success. We'll see you all next year for Ponies and Snakes 11 - see our website at poniesandsnakes.com for more info.
Removing the windshield has been an ongoing process which I finally completed the other night. I got the trim off a few weeks ago, but I only recently found somewhere to actually store the windshield (in the basement, since you asked). Getting the trim off around the window is a real chore, as has been well documented on VMF, but I was still keen to do it myself. When I was asking around for advice, one of the guys in BAMA told me to "get a glass guy to do it." After that I was determined to do it myself.
The primary resource for windshield removal is this film clip by Mark Stang. The only thing I can add is that if you don't have the molding removal tool shown in the film, then you can make one out of a paint can opener...it just takes a bit of time at the grinding wheel.
Once the trim was out of the way, I was shocked to discover just how much crud was underneath the molding...a lot of bits of dead leaves mixed with who knows what. I started by trying to scrape it out with a small piece of plastic.
Pretty soon I had to stop and tape up the cowl vents - no point making more work for later...
Next I scraped out a layer of old rubber sealant or something similar - it had the consistency of that stuff on the bottom of a mars bar
I've read a lot about using a piano wire to cut around the windshield gasket, but I couldn't really see the point - I just cut through the outer side of the gasket with the blade from a Stanley knife and then pushed out the glass from the inside. You have to work your way around the top edge and the sides of the windshield, pushing gently on the glass to break the seal; the screen should then lift out.
It's quite satisfying that I got the windshield out entirely on my own without breaking it, or even nearly breaking it. After all I've read, it was quite easy and I may even have a bash at putting the new glass back in. I am 99% certain I'm not putting the original glass back in as it has a couple of huge half dollar sized chips and several scratches from the wipers. I'm hoping to reuse the backlite as that is in much better shape.
Inside the gasket is a load of sealant type gunk, which has to be scrapped out. I was stealing myself as I poked around the lower edge, as I expected to find rust in this area. Fortunately there wasn't any. Yay!
I was busy admiring the inside edge - a bit of peeling paint, but otherwise what looks like perfect metal underneath - when I noticed...a PHILLIPS SCREW holding in one of the trim clips!! Hello!! How did that get there...oh I see...of course, the windshield has been out before...Now lets get this straight: I have NO problem with this car having been well looked after and previously restored - far from it....but so much of it doesn't make sense.....
So it seems like I've been really close to finishing the tear down for ages; I guess I underestimated how much work was still left to do. Last weekend I took a break to watch the World Cup, but did manage to fit in a few hours of garage time. started by pulling out the master cylinder. Since my car came with a dual MC, I have the option of putting the same one back.
The MC is bolted to the firewall, but to remove it you first have to disconnect the brake pedal. This was achieved in m,y case by pulling out a piece of bent wire from the pedal pin and wiggling the brake light connector out of the way:
The push rod can then be lifted off....
then it is just a matter of taking
out the two bolts to the firewall and disconnecting the lines to the
pressure differential valve.
Next out was the assembly which holds the clutch and brake pedals. I wasn't actually expecting to be able to remove this monstrosity in one piece, but once I figured out it wasn't welded in, there was no stopping me. Cleaning up the area under the dash is going to be much easier with this out of the way, and now I can add this to the sand blasting pile instead of cleaning it up in situ.
Last to go was the steering column. I went back and forth on whether to leave the column in until the last minute, as steering the car is next to impossible without it. In the end I decided to invest in a set of car skates, which I would probably have done at some point anyway. To get the column out is straightforward. There are several bolts at the hold in bracket halfway down the column.
Then there are another bunch of bolts and sheet metal screws at the inside of the firewall. The sheet metal screws on this bracket are defiantly not stock, so another sign of a previous restoration attempt. I'm starting to wonder if there is any part of this car that has not been apart before....
After that there are a pair of bolts to remove at the rag joint, "and that is it!"*
I'll be replacing the rubber firewall gasket, and I'd like to replace the rubber concertina tube....but I can't work out how to get it off the column.
Done! The interior really is finished now...apart from the headliner.....
I'm reasonably happy with the rate of progress tearing down the car. The interior is almost completely gone with only the steering column, clutch and brake pedals and the park brake assembly left to remove. My original target was to have the tear down completed before the INDY 500, but in the event I didn't quite manage it. I started taking out the park brake handle and
linkage before the trip, but only managed to complete it after I got back.
The bracket which holds the park brake handle to the firewall is located just behind the steering box - this bracket also holds one end of the clutch equalizer spring in place, so it makes sense to remove the spring before unbolting the bracket.
Once the spring is gone and the bracket removed, the clutch pedal bar can be detached from the equalizer bar. I'm going to remove the clutch pedal later.
Removing the park brake cable from under the car is a simple matter of disconnecting the cable and removing the hardware.
The entire underside of the car is covered in a gunky mixture of oil and dirt - the legacy of several moths of operation with a leaking oil pan gasket. Cleaning all this muck off the car is going to be a real chore....oh well...
The linkage is held to the under-body in several places - once the clips are off, the connectors twist out. Only one connector was really tough to remove, but I eventually forced it off the frame.
While working under the rear of the car I noticed the drivers side frame rail has a huge "rip". It's hard to imagine why someone would do this - seems like a very radical way to "inspect" the inside area....even more difficult to imagine how it could happen by accident. Weird. I guess I'll have to try and close this up later.
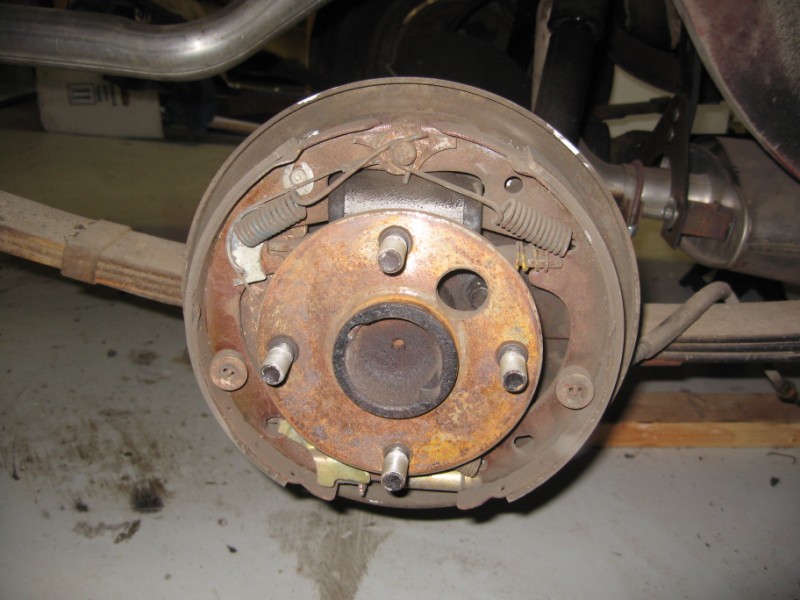
I wasn't really intending to remove the rear brakes yet - at some stage I will be replacing the rear axle - but I found the drums and shoes had to come out before I could get at the park brake linkage connection.
The ford manual I have been working from recommends a special tool for clamping the brake cylinder before removing the springs, but I found that yanking the springs off with a pair of snipe nosed pliers worker just as well.
After that the shoe retaining springs are easy to remove and then the parking brake link bar and spring can be lifted out.
The park brake linkage connection was really tough to get off. After twisting the fitting back and forth and poking at it with a small screwdriver I finally managed to get it through the hole in the backing plate. The other side was just as much trouble to get out too.
Finally I have the both rear brakes and the park brake off the car. There really isn't much more to remove before I can start on the bodywork