Showing posts with label gas tank. Show all posts

Monday, October 5, 2015

interior round-up

Most of the work described in this post was done at the old garage in preparation for the move - essentially I had to put the seats back in before I could move, and while I'll have to take them back out at some point to restore them (and install the carpet), I wanted to make sure all the surrounding areas were buttoned up.

Now then, now then: if you're going to drive around in a vintage car, then you have to accept some compromises on safety. I'm fortunate that 68 was the first year that ford replaced the "spear" steering column with a collapsible design and made a number of other modifications to improve safety, such as the rear side marker lights. In addition I've made my own improvements such as the SSBC brakes and 3-point seat belts (see below).

Given what we know about gasoline, it's always surprised me that the gas tank (also known as the trunk floor) is separated from the passenger compartment by nothing more than a flimsy sheet of cardboard and the rear seat back. A common modification among the guys in BAMA is to install a steel or aluminum sheet instead. I followed this path after my buddy Chuck acquired a suitable obsolete steel sign, which I trimmed, covered with faux-dynamat at the trunk side, and installed with sheet metal screws.

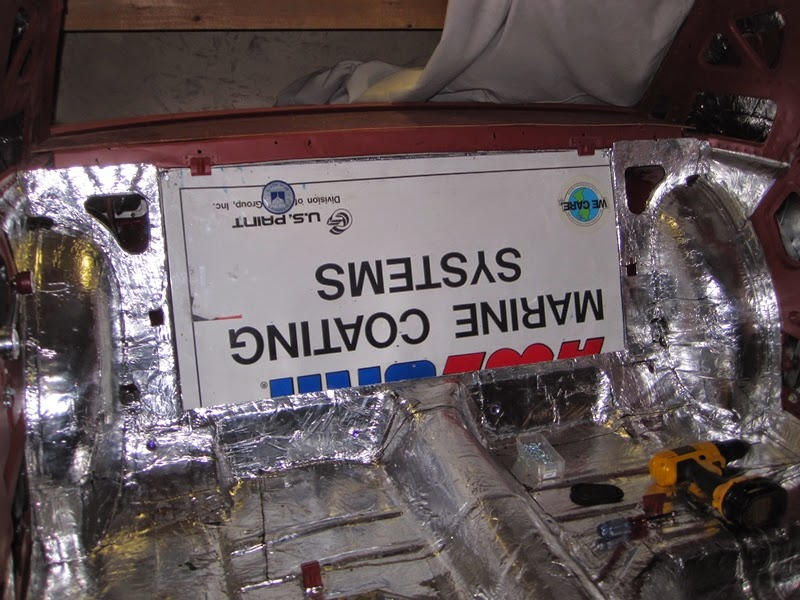
Much safer!

Absolutely forever ago (when I had the old garage set up as a paint booth) the rear seat side panels were stripped down, and repainted. I had to remove some light surface rust on the inside, and I scrubbed off all the remnants of the old foam sound insulation.


After painting, thick foam insulation was glued onto the insides of the panels with the 3M yellow weatherstrip adhesive (but not photographed) and the Kraft vapor barriers installed using windshield caulk to provide a seal. To be honest it was really hard to squirt sticky black paste over my beautiful car...but I found a way. After the panels were installed I attached the window winders, and tested the quarter windows....and applied my BAMA decal in the passenger quarter window.


Another improved safety feature of the 68 over the earlier cars was shoulder belts as well as lap belts for the front seats. This means that installing 3-point seat belts in a 68 is a good deal easier than in the preceding cars because the upper mounting point is already there. I actually purchased the seat belt kit more than two years ago, because I wanted to test all the mounting points before I put away the welder.


After I Moved to the present garage I found the seat belts while looking for something else, so I took ten minutes out to installed them. The lap belts in the rear seat are for show. This will be a two-seater car when it's on the road.

Friday, June 27, 2014

waiting for the heads

OMG It's been FOUR months! There have been a number of "down" periods on this project - and many more periods of intensive work - but that last few months have been somewhere in-between: short bursts of work punctuated by longer periods of...nothing. Oh well...

At the end of my last post I found myself unexpectedly in need of a valve job and without a machine shop. There are ways to find these things I guess (like the interwebs), but, as mentioned countless times already in this blog, I like to start by asking the guys in BAMA when I need something. What was unusual about this time around was that instead of finding a machine shop, I found a specialist head builder that was already in the club! In fact, the owner of Heads by Steve in San Ramon has decades of experience building heads, many have which have been run in NASCAR teams.

So I cut a deal with Steve to do the valve job, install 7/16 inch screw-in studs, and port match the heads to the gaskets and the intake manifold. When the heads came back a few weeks later they were just....well....immaculate.


And the ports were just so smooth, I could see the increase in power!


While the heads were away, I was marooned at home, surround by lots of boxes filled with shinny new engine parts. This spurred me on to crank through some of the half- and three-quarter-finished mini projects I'd previously abandoned. The first one was the tail lights and trunk wiring harness, which I couldn't face after the painful process I endured below the dash. The tail light buckets were refurbed, and painted brake gray (outside) and brilliant white (inside) back in the Green Room days.


The concave tail lights were the feature that first attracted me to the 67/68 cars in the first place. I acquired a bunch of extra OEM trim pieces from my buddies up the Street at Mostly Mustangs and picked out the best six pieces. I replaced the rubber pads, although attempting the glue the new pads to the trim pieces with weatherstrip adhesive was an abject failure. The studs and nuts were zinc plated way back when...


The tail light connectors were, of course, not included in the Pathetic Painless wiring harness, so I adapted the originals. I did the same with the back up lights. And the fuel tank sender connector....and most of the stuff in the engine compartment too no doubt. The Pitiful Painless harness was actually too short to reach both tail lights, so I did a bunch of chopping and joining of wires that I would rather not have had to do. In the middle I ran out of the wire connectors supplied in the P...p...p...FUCKING AWFUL Painless kit, and had to run to Home Depot. Grrrr!!


I also completed installing the Dynamat in the passenger compartment and taped the joints. Long-overdue!


Next time: Engine Rebuild. I mean it this time!!


Sunday, July 15, 2012

into the red

What color to paint your car? It's a tough question, in fact one of my friends from BAMA agonized for two years before settling on the merlot jewel metallic paint job you can see below for his 65 fastback. For me it was a decision I made before I bought my car: I was never intending to repaint (or restore...) the car originally, so I chose what I wanted and bought that car. However, when you have everything back in primer, it's tempting to think about alternatives. I considered for a while changing the shade of red to something lighter or more orange, but that probably wouldn't have worked so well with the maroon interior, so I've decided I'm sticking with the original Ford Candy Apple Red (note: this is a solid color and not a candy-style paint job). The one thing that will be going though is the naff white roof my car had when I acquired it.


I'm still not decided on whether I'll be painting the entire car myself, although I'm leaning towards it, but I will be doing the jambs, underside of the hood and deck lid, and inside the trunk. I mentioned in my last post about how converting my garage into a paint booth takes a lot of effort, so I decided I would do a bit more than just the epoxy primer. I picked the trunk as my starting point because I wanted to have a go at spraying urethane base coat/clear coat somewhere where it doesn't matter - most of the trunk will be covered up with mats, spare wheel etc, so I couldn't really go wrong. A lot of the car was already masked off from painting over the new body work so I just had to expose the trunk and seal it off from the rest of the car.


It doesn't show that well in the pictures, but before I started painting I scuffed up the trunk real good with a scotchbrite and wiped down with denatured alcohol. Then I laid down a thin coat of PPG DP74LF red oxide epoxy primer which I mixed 2:1 with DP401LF activator as usual and then added one part of acetone (so a 2:1:1 overall ratio). While the primer was flashing I mixed up the urethane base coat: I used PPG DBC "K" Color to which I added DT870 medium reducer in a 1:1 ratio. I sprayed on two coats with a 45 minute flash time. I followed up with two coats of urethane clear made up of four parts of DCU2021 with  one part DT870 reducer and one part DCX61 urethane hardener (4:1:1). It came out really well with just a few (mostly inconspicuous I hope) runs.


At the same time I did a bit of work on the gas tank. Started by masking off the top side:


Then I scuffed up the underside and sprayed on a very thin layer of epoxy primer and two coats of clear coat. This look will match the underside of the car.


I let the clear coat harden overnight and then masked it off before scuffing up the topside/trunk floor.


The top side got the red base coat as well as the clear because I want it to match the trunk, even though it will be mostly covered up. This came out really nice without any runs. So happy with my choice of color!

Sunday, March 21, 2010

gas tank

The gas tank is theoretically easy to remove, but for me it was a real PITA! I started by siphoning off the gas and transferring it to one of my other cars, and then I ran the car for a few minutes to get rid of the last bit of gas. It's best if you do the last bit outside of the garage unless you want to get CO poisoning.


Disconnecting the fuel line and sender unit underneath the gas tank is easy.


I didn't need to look at the filler-pipe-to-tank connector for long to work out that it was a repro.


The fuel filler pipe should be fitted with a cork gasket. This one is a recent replacement and is good enough to reuse. The filler pipe looks like it may be original.


I cleaned up the filler pipe with a wire wheel. If I decide to get this plated later, I will need to do a better job of the polishing. 


The fuel tank is held in with a dozen or so bolts...and a mother-lode of what looked like rubberized gasket sealer (?). After I removed the bolts, I tried prying on the edge of the gas tank but it was stuck fast. The trunk was already pretty well scratched up, but I still did not want to go in with a crow bar. In the end I tried an idea from one of the guys on VMF. I basically put the floor jack under the gas tank*, lifted the car up until the wheels were off the ground, and then let the car sink back down. It took about 20 minutes, but then the gas tank lifted straight out. *If you're going to do this, you need something to spread the load out over the whole of the gas tank. I used a three foot section of 2x12 lumber I had in the garage.


Getting the goop off of the tank and the car was a nightmare...it was slightly soluble in penetrating oil, but even so, it is a really messy business getting rid of it. I must have used a million shop towels...but eventually it was all gone and I could stash the gas tank in the basement.