Rust treatment is one of the things you just have to get right when you're restoring a vintage car....and in my last post I described how my use of POR-15 was ultimately a disappointing experience. Fortunately that isn't the end of the story. In fact, in terms of treating rust that I just couldn't get rid of any other way, I've had a lot more success with
Zero Rust. In fact, the main reason for using POR-15 in the first place was that I wanted a shinny black finish on the relevant parts. However, the future for Zero Rust, and all the other so-called rust treatments, is starting to look somewhat...err...corroded...thanks to the emergence of a new power.
My own definition of what makes a good idea has always been something that I really wish I thought of myself - and by good idea I'm not talking about something pretty cool, I'm referring to those life changing ideas that just don't come around every week. Or even every month. And, since I have a background in organometallic chemistry, I could well have thought of this one:
take rusty piece of metal....put into bucket containing magic rust removal solution...wait...remove de-rusted metal...rinse and repeat. The reality though, is that the first I heard of this idea was when I read
Thinking Outside the Rusty Box on the
Boss Blog (as I call it). In fact, in order to get the best from the remainder of this post - or indeed to understand it at all - it is imperative that you read the above article and the even more important follow up
Thinking Outside the Rusty Box part two before reading any further.
So....to summarize...the magic solution I used is really called
Esprit Performance Rust Remover. It came from Rust Depot in NY and this particular brand includes a mixed in cleaning agent )more on that later). I ordered up a gallon of the concentrate, which came to about 80 dollars with shipping etc. While I was waiting for delivery I searched out the rustiest, most corroded parts I could find - the brackets from behind the front market lights were ideal. To be truthful I would have thrown these brackets in the trash if I could have found reproductions in any of the Mustang parts
catalogs.
 |
| perfect candidates to test my
magic solution |
One evening after
work I mixed some of the concentrate with six
equivalents of hot water, tossed in the rusty brackets and left them to soak. The next evening I checked in, and I have to say I was surprised at how great the results were:
 |
| Not perfect, but WOW !! |
 |
| Inside wasn't quite as good, but it was a heck of a lot better |
OK, so the results were not perfect after 24 hours, but I was still absolutely AMAZED. It's one thing reading about this on a blog, however reliable you believe it to be, and another seeing it yourself in your own garage. So next step...upscale. I'm fortunate that I didn't need to apply the magic solution to the body shell, so it was onward with the small parts.
 |
| The only limits are the size of the box |
Here's a selection of "before" pictures:
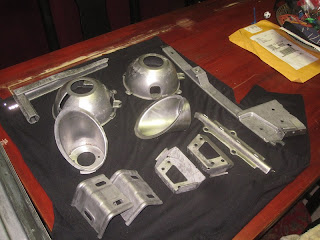
After 3-4 days soaking in the solution, every spec of rust was gone. Here's the "afters":
I mentioned above that the
Esprit product contains a cleaning agent. This really helped with parts like the door latches which had a kind of aged hue (in addition to the obvious rust), but came out sparkling after 3-4 days soaking...although you'll have to take my word for it because I don't have an after photo!


