Sunday, January 30, 2011

turlock swap meet and rotation

I hate to admit it, but before this weekend I'd never been to a swap meet! Still, to quote one of my companions on Saturday's trip, the Turlock Swap Meet is "a great place to lose your cherry"! And it was too, since there were several hundred vendors offering all manner of automotive parts, tools and associated tat.

In every walk of life it's not what you know but who you know, and when the guys you're traveling with are buddies with one of the vendors - the world famous Mostly Mustangs of Oakland - that means you get in free and, much more importantly, you can park on their pitch instead of at the punter's lot half a mile away. That's almost enough to get you over the indecent departure time of 5:30 am! The last time I was awake at this time on a Saturday I was proabably on my way home from a nightclub....15 years ago!

The crew from Mostly Mustangs as supplies dwindle
The best stuff goes early at Turlock
You name it and it's probably there somewhere!

I got lucky with a really nice export brace and a straight Monte Carlo bar which I picked up dirt cheap.


I couldn't resist putting the new shinny bits on my car right away. Hopefully I'll be able to bolt them in for real one day.

>

Turlock is also great for very cheap second hand tools - this pile of stuff got to come back to my garage for around sixty dollars in all.


There are a bunch of cars for sale at Turlock, including some real basket cases. The half-and-half car below wasn't actually for sale, but it was easily the coolest vehicle on display.


So that was Saturday. On Sunday, after a much needed lie in, I went kart racing with BAMA at UMIGO in Livermore. There wasn't much time left for working on my car, but I did manage to push it out of the garage for the first time in almost a year, and give the floor a quick clean up.


I then succeeded - eventually - in executing a three point turn outside my house and putting the car back in the garage the other way round. This was a lot more effort than I anticipated as I live on a slope, and I won't be attempting to do this on my own again any time soon.

This is where I found out how heavy my car is

Finally back in the garage without serious mishap, and all ready to have the motor pulled out sometime in the next few weeks.

Saturday, January 22, 2011

the doors get a makeover

Back in the summer I tore the doors down to just the shells - getting the window winding mechanism out was easily the toughest bit, and I wrote about it here. Since then, I've been working on other things, and with limited space in the garage, I just left the doors on the car. What I did find out though was that my doors don't match, and I'm not just talking about one being a mirror image of the other. Here's the driver side door - looks in pretty good shape I think you'll agree...


...and here's the passenger side. That's right it's black instead of red on the area behind the door panel. How did that happen...? Well, it's not the original door, that's how.


When it became time to work on lowering the seat platforms, I got so fed up opening and closing the passenger door that I just took it off, so it seemed like I may as well move onto the doors next. The picture below, which I like to call "Rainbow Door", was taken just after I unbolted the hinges. Clearly the door originally came from a springtime yellow car with a black interior. Looking at this picture, it's hard to believe how long I owned my mustang before I noticed it had a "ringer" passenger door...it is just so obvious!


The outer door handle wasn't removed for the paint job, and the red paint in this area is as thick as an egg shell...a cracked egg shell in fact.
 

The front edge wasn't in great shape either - there is some corrosion where the hinges were cited - we already know that Ford painted these cars with the doors on, so the area behind the hinge was never primed or painted.
 

Long term I'll either be painting the car myself, or having it done professionally, but for now I'm working my way around each panel in turn. There is obviously no way this door can be re-sprayed as is, so I considered the options for removing the umpteen layers of paint:
  • Chemical dipping - I've heard stories on VMF and elsewhere about chemicals seeping out of seems in body panels long after the dipping process and messing up expensive paint jobs, so I'm wary about it, plus I couldn't find a suitable facility close to my house.

  • Media Blasting - The best quote I could find locally was 75 bucks per side...so 300 for a pair of doors, which seems like a heck of a lot.

  • Chemical stripping - the aircraft stripper I used on the rear valance is kind of expensive, but it worked really well, and compared to the cost of media blasting, it's actually dirt cheap, so I decided to give it a go on the doors.
I started stripping on the interior side. The red paint started bubbling as soon as I brushed on the aircraft stripper...getting it off was ridiculously easy.


The underlying black took another application of stripper, and a wait time of 5-10 minutes to start peeling, but then that too came off quite easily with a plastic bondo scraper and a small wire brush. I was actually able to get all the paint out of the creases in the textured surface with very little effort - this had been a concern before I started, as I want to preserve the original textured finish (don't we all...).


The aircraft stripper also made light work of the residue from the door's weather stripping and the springtime yellow paint.


Paint stripping, for me, is a perfect evening task: I don't really get much more than an hour a night to work on my car, and usually that isn't enough time to get into something, but a couple of evening sessions on the door was all it took to strip the interior side and edges.

 
Fortunately there is no serious rust at the bottom of the door - in fact there is hardly any damage at all, even at the drain holes. Nice!

 
There is some corrosion at the hinge points as I mentioned above, but with the paint stripped off, this damage looked much less threatening.


Getting the paint off the outside of the door was much tougher than the inside. The first layer of red took a couple of applications of the stripping compound, and then gave way to a purple/gray color.


Under that was another layer of red - a completely different shade to the top coat, and then several thick layers of springtime yellow.


After hacking away at the yellow (I think off-white would be a better description) I got through to the factory gray primer...


...and then, finally, to bare metal...although it turned out to be a false dawn.


Basically, I found that some PO had repaired some damage to the door at the front apex with body filler - and a long time ago too, as the filler was underneath the springtime yellow paint. I found that aircraft stripper also works on destroying body filler, albeit a thin layer at a time.


With all the old filler removed I found several small holes and some dents that I'll have to fix properly later.


I also discovered that this was the only area of the door where I could get at bare metal - the aircraft stripper made absolutely no impact on the factory primer - I'm guessing the primer was previously sanded off near to the repair.


Ultimately I got out a 150 grit sanding sponge and a bowl of warm water and got rid of the primer that way. I was left with a really nice looking door, apart from the minor damage at the front edge.


Did I say a really nice looking door? Well outside maybe, but inside was a different story; plenty of corrosion here.

The worst part, from an accessibility point of view, was inside the front edge:


I did my best to get rid of as much corrosion as possible using sandpaper and a stiff wire brush, but I balked at the idea of using the wire wheel inside the door. I'm just not that tough.


When the inside was as good as I could get, I cleaned up with a rag soaked in lacquer thinner and then taped off all the small openings in the door.


Then I broke out a can of Zero Rust and set to work with a foam brush. This required turning the door round a few times and squeezing my hand and forearm inside the door. Probably the most awkward paint job I've ever done. It took a few attempts to get the paint everywhere I wanted - it seemed like every time I came back to inspect the door I could fine another small area I had missed. This is the end result:

Looking towards the front of the door

And the view in the opposite direction

The driver side door was a little bit different. For a start it was in better shape, and, as far as I could tell, had never been repainted on the interior side.


The first issue was what to do about the body ID tag...painting round it would be tricky, and stripping round it...well that's just asking for trouble. So I drilled out the pop rivets and took it off.
Now you see it....

I'm aware that removing body tags is, strictly speaking, illegal....but it has to be the way forward in this instance. Taking a tag off one car and putting it on another with the intention to mislead is one thing, but removing a tag for restoration purposes and then putting it back - well making that a crime is just daft...and that's the defense I'll be sticking with if the DMV show up in my garage in the next few years.

....and now you don't

I didn't find any body filler or serious damage to the door this time, but there was an odd looking braised joint at the top of the front edge which I ground down.


Getting the paint off the exterior side of the door was completely different to the passenger side - the stripper never really produced any bubbles, but I found that by applying it and waiting ten minutes I could remove the paint really easily with a sharp putty knife. I was worried about gouging the metal this way, but I managed to get away without doing so.


With the door stripped there was just the question of what to do about the mounting holes for the driver side mirror - I'm not going to put the stock mirror back on as I don't particularly like it, so it probably makes sense to close up the holes in the door and then drill new ones for the new mirror....but I'm still undecided. So for now I just decided to remove the inserts. This turned out to be easier said than done, as I couldn't figure out any way to removed them in one piece, so eventually I broke out the drill and let destruction take it's course.


With the inserts removed, I need to decide whether to try welding up the holes or just paint the door and add this particular issue to the "worry about it later" list...almost certainly it will be the latter.


Then it was on with the Zero Rust inside the door, which was just as tedious as it was on the passenger side!

Sunday, January 16, 2011

passenger compartment part one

The way my restoration is going, by the time I have the car running again there probably won't be a single bolt left unturned, or a square inch of metal I haven't repainted. I've actually been very lucky with my bodywork when I consider how little time I spent inspecting it before I bought the car. Apart from some small holes in the trunk well and the driver side wheel arch, the sheet metal is in excellent condition. I do however have my fair share of surface rust, which, wherever possible, I have ground down and treated with Zero Rust. The thing is, not everywhere is accessible to the wire wheel - this is an issue I faced while I was working on the trunk. And I had the same problem around the inner lip of the roof (note: I have no idea why the underside of the roof is covered with speckles of white paint, and it was the same in parts of the trunk...how odd).

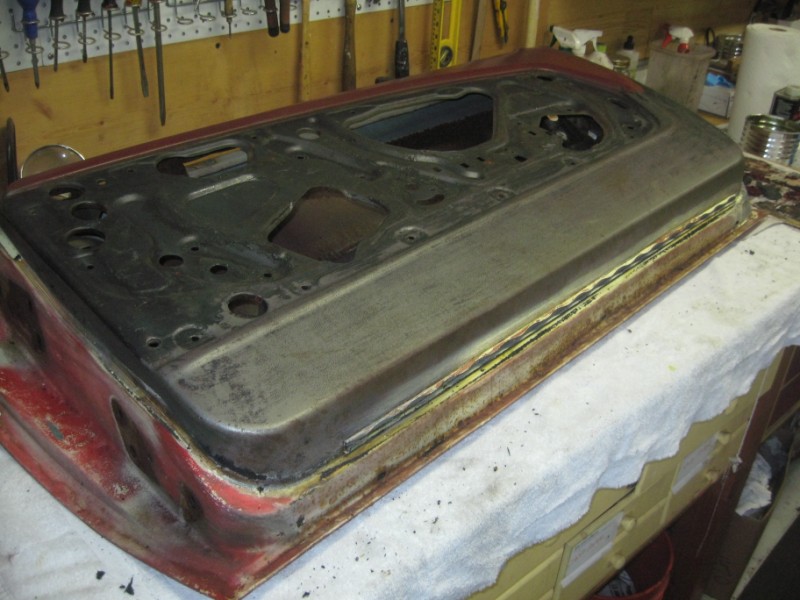
Crusty rust around the inner lip of the roof

I did what I could to sand off the surface rust around the inner lip*. I also scuffed up the underside of the roof - although most of this area was rust free, it was covered with residue from the adhesive used to stick on the roof insulation (*actually, my Dad did the sanding when he was helping out one day while I worked on something else).


The whole area around the edge of the roof then got a good going over with Zero Rust which I applied with a small foam brush - this was perfect for getting a good amount of paint into the tight space.


The roof looked rather odd with a painted strip around the perimeter. I know it really doesn't matter what it looks like as the headliner will cover it all up, but I just couldn't leave it like that...so I painted Zero Rust over the entire underside of the roof - I can't do any harm, and the worse that can happen is that it will peel off. I'm probably two years or more away from installing the new headliner, so I should know by then (!)


The situation inside the C-pillar was similar to the edges of the roof - plenty of surface rust, and very difficult to get at it, even with sandpaper. I did as much as I could, but ultimately had to accept that some parts of the bodywork are just inaccessible.


The inside of the C-pillar then got the Zero Rust treatment too...as far as was possible.


Next up was the inside of the quarter panel (is there a better name for this area?). Adhesive from the vapor barrier was plastered all over the outer panel...


...but this came off quite easily with some lacquer thinner on a shop towel - this method does remove some surface paint, so bear that in mind if you're going to use it. I also hand sanded as much of the surface rust inside the panel as I could get at. I used an eighteen inch piece of garden hose attached to my shop vac to clean up inside the opening.


I was planning to deal with the surface rust inside the quarter panel next, but I got sidetracked by the corrosion on the wheel arch. I went over this area with a 4.5 inch wire wheel on my angle grinder, and got most of the rust off, but the underlying metal is pockmarked.

Pockmarks in the wheel arch just about visible

At this stage I got a bit carried away with the grinding wheel. It was always the plan to take off the seam sealer, as most of it was cracked and loose anyway and there was even some light rust underneath in places...and I just carried on going with the wire wheel until quite a large area of the floor pan was cleaned up. Then I had to clean up inside the quarter panel for a second time...


...before I could apply the Zero Rust everywhere I could get to inside the panel. It's a good idea to wear long sleeves while doing this - I just  had a t-shirt on, and by the time I was done there was as much paint up my arm as there was on the car.


Here's a shot from inside the panel after the paint dried. This one is looking down from the quarter window opening towards the rear of the car.


The next picture is looking down and towards the front of the car. Pretty good coverage I think.


The driver side was in similar shape...


Before attacking the rust, I wanted to remove the driver door strike plate. I got the passenger side off with a #4 Philips screwdriver and plenty of liquid wrench, but this time the bolts were rusted solid - after squirting on liquid wrench every day for a week, I gave up and drilled out the bolts. This was a lot tougher than it sounds, and I destroyed a 7/64 ths drill bit in the process, but...eventually...I won.


The residual pieces of bolt thread were removed from the captive nuts by running a tap drenched in cutting fluid through the holes. Fortunately I didn't do any damage to the thread with the drill - I know because I tried putting the strike plate back on with the bolts from the other side of the car and it worked fine. Now I just need to find some replacement bolts...what's the betting I end up buying a new strike plate too?

Drilling out the bolts produced a satisfying pile of metal filings

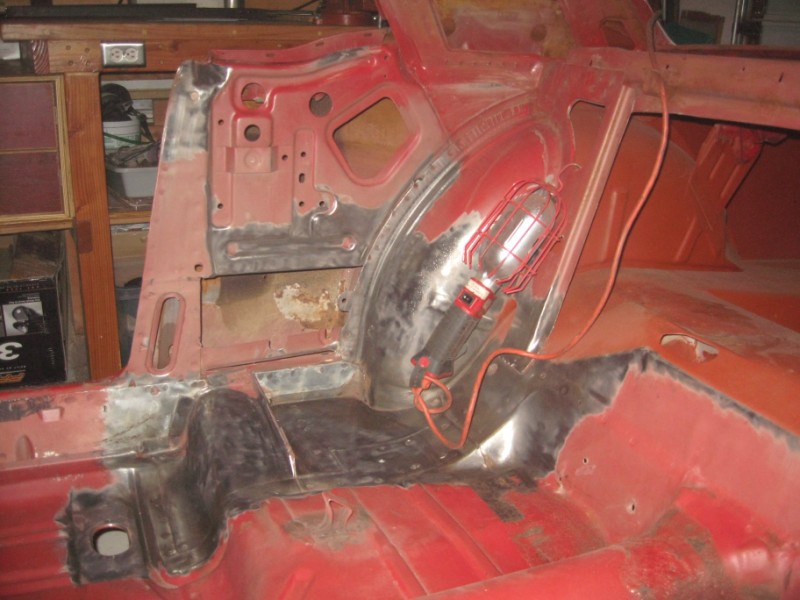
Here's the "before" shot of the driver side inner quarter panel...plenty of rust here.


It's hard to see in the above photo, but there is a hole close to the wheel arch. Really I should have dealt with this issue before cleaning up the inside of the panel, but my welding skills are not up to a job like this just yet, so it's on the "come back to list" until I get some more practice with the MIG.


The "after" picture taken once the inside of the panel and the C-pillar had been  hand sanded as far as possible and a coat of Zero Rust applied.

Yes, that is a rare turn signal hood in the background.