

...and here's the passenger side. That's right it's black instead of red on the area behind the door panel. How did that happen...? Well, it's not the original door, that's how.

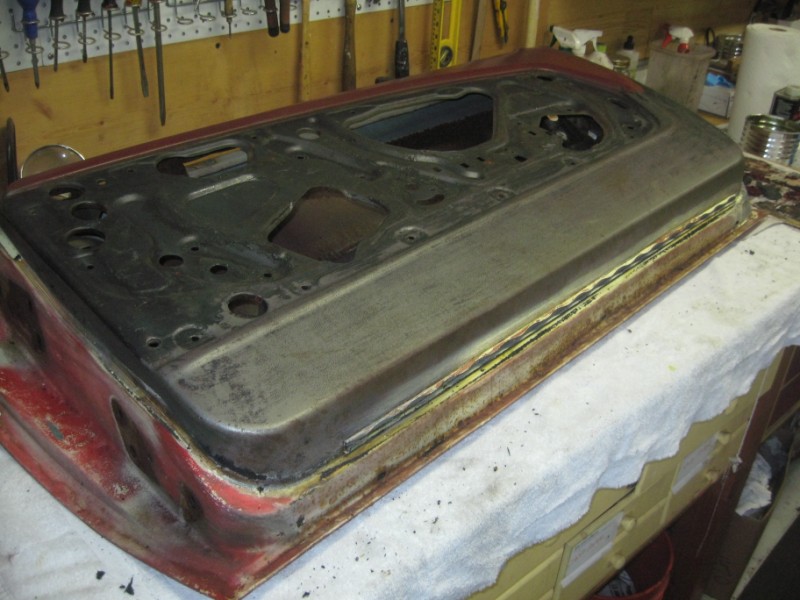
When it became time to work on lowering the seat platforms, I got so fed up opening and closing the passenger door that I just took it off, so it seemed like I may as well move onto the doors next. The picture below, which I like to call "Rainbow Door", was taken just after I unbolted the hinges. Clearly the door originally came from a springtime yellow car with a black interior. Looking at this picture, it's hard to believe how long I owned my mustang before I noticed it had a "ringer" passenger door...it is just so obvious!

The outer door handle wasn't removed for the paint job, and the red paint in this area is as thick as an egg shell...a cracked egg shell in fact.


Long term I'll either be painting the car myself, or having it done professionally, but for now I'm working my way around each panel in turn. There is obviously no way this door can be re-sprayed as is, so I considered the options for removing the umpteen layers of paint:
- Chemical dipping - I've heard stories on VMF and elsewhere about chemicals seeping out of seems in body panels long after the dipping process and messing up expensive paint jobs, so I'm wary about it, plus I couldn't find a suitable facility close to my house.
- Media Blasting - The best quote I could find locally was 75 bucks per side...so 300 for a pair of doors, which seems like a heck of a lot.
- Chemical stripping - the aircraft stripper I used on the rear valance is kind of expensive, but it worked really well, and compared to the cost of media blasting, it's actually dirt cheap, so I decided to give it a go on the doors.

The underlying black took another application of stripper, and a wait time of 5-10 minutes to start peeling, but then that too came off quite easily with a plastic bondo scraper and a small wire brush. I was actually able to get all the paint out of the creases in the textured surface with very little effort - this had been a concern before I started, as I want to preserve the original textured finish (don't we all...).
The aircraft stripper also made light work of the residue from the door's weather stripping and the springtime yellow paint.

Paint stripping, for me, is a perfect evening task: I don't really get much more than an hour a night to work on my car, and usually that isn't enough time to get into something, but a couple of evening sessions on the door was all it took to strip the interior side and edges.

Fortunately there is no serious rust at the bottom of the door - in fact there is hardly any damage at all, even at the drain holes. Nice!

There is some corrosion at the hinge points as I mentioned above, but with the paint stripped off, this damage looked much less threatening.

Getting the paint off the outside of the door was much tougher than the inside. The first layer of red took a couple of applications of the stripping compound, and then gave way to a purple/gray color.

Under that was another layer of red - a completely different shade to the top coat, and then several thick layers of springtime yellow.

After hacking away at the yellow (I think off-white would be a better description) I got through to the factory gray primer...

...and then, finally, to bare metal...although it turned out to be a false dawn.

Basically, I found that some PO had repaired some damage to the door at the front apex with body filler - and a long time ago too, as the filler was underneath the springtime yellow paint. I found that aircraft stripper also works on destroying body filler, albeit a thin layer at a time.


The first issue was what to do about the body ID tag...painting round it would be tricky, and stripping round it...well that's just asking for trouble. So I drilled out the pop rivets and took it off.


With the inserts removed, I need to decide whether to try welding up the holes or just paint the door and add this particular issue to the "worry about it later" list...almost certainly it will be the latter.


With all the old filler removed I found several small holes and some dents that I'll have to fix properly later.

I also discovered that this was the only area of the door where I could get at bare metal - the aircraft stripper made absolutely no impact on the factory primer - I'm guessing the primer was previously sanded off near to the repair.

Ultimately I got out a 150 grit sanding sponge and a bowl of warm water and got rid of the primer that way. I was left with a really nice looking door, apart from the minor damage at the front edge.

Did I say a really nice looking door? Well outside maybe, but inside was a different story; plenty of corrosion here.

The worst part, from an accessibility point of view, was inside the front edge:

I did my best to get rid of as much corrosion as possible using sandpaper and a stiff wire brush, but I balked at the idea of using the wire wheel inside the door. I'm just not that tough.

When the inside was as good as I could get, I cleaned up with a rag soaked in lacquer thinner and then taped off all the small openings in the door.

Then I broke out a can of Zero Rust and set to work with a foam brush. This required turning the door round a few times and squeezing my hand and forearm inside the door. Probably the most awkward paint job I've ever done. It took a few attempts to get the paint everywhere I wanted - it seemed like every time I came back to inspect the door I could fine another small area I had missed. This is the end result:
 |
| Looking towards the front of the door |
 |
| And the view in the opposite direction |
The driver side door was a little bit different. For a start it was in better shape, and, as far as I could tell, had never been repainted on the interior side.

The first issue was what to do about the body ID tag...painting round it would be tricky, and stripping round it...well that's just asking for trouble. So I drilled out the pop rivets and took it off.
 |
| Now you see it.... |
I'm aware that removing body tags is, strictly speaking, illegal....but it has to be the way forward in this instance. Taking a tag off one car and putting it on another with the intention to mislead is one thing, but removing a tag for restoration purposes and then putting it back - well making that a crime is just daft...and that's the defense I'll be sticking with if the DMV show up in my garage in the next few years.
 |
| ....and now you don't |
I didn't find any body filler or serious damage to the door this time, but there was an odd looking braised joint at the top of the front edge which I ground down.

Getting the paint off the exterior side of the door was completely different to the passenger side - the stripper never really produced any bubbles, but I found that by applying it and waiting ten minutes I could remove the paint really easily with a sharp putty knife. I was worried about gouging the metal this way, but I managed to get away without doing so.

With the door stripped there was just the question of what to do about the mounting holes for the driver side mirror - I'm not going to put the stock mirror back on as I don't particularly like it, so it probably makes sense to close up the holes in the door and then drill new ones for the new mirror....but I'm still undecided. So for now I just decided to remove the inserts. This turned out to be easier said than done, as I couldn't figure out any way to removed them in one piece, so eventually I broke out the drill and let destruction take it's course.

With the inserts removed, I need to decide whether to try welding up the holes or just paint the door and add this particular issue to the "worry about it later" list...almost certainly it will be the latter.

Then it was on with the Zero Rust inside the door, which was just as tedious as it was on the passenger side!


Awesome job there. It's a ton of tedious work but I think the rewards are worth the trouble. Mainly that you won't have to dork around with trying to fit a repro door.
ReplyDeleteI've seen a some repro doors on a mate's car, and let me tell you, they really suck!
ReplyDeleteWOW! That is a lot of work you've done there! Excellent documentation and some great shots of the work. Just out of curiosity, are you thinning your Zero Rust when you brush it or painting straight from the can?
ReplyDeleteThanks Sven. I'm painting the ZR straight from the can; it never occurred to me to thin it to be honest...should I have?
ReplyDeleteSorry for interrupting but just thought I'd interject that I only thin it 15% when I spray it. Otherwise, I've always brushed straight from the can.
ReplyDeleteI dunno guys! I am trying some of the Zero Rust in black and this stuff is pretty thick and tough to brush with a foamy. Ended up sticking to a bristle brush to get it on reasonably well, but I hate brush marks. Was thinking a bit of thinning might help but not sure. I might try a bit of reducer on my next round and see what happens.
ReplyDelete