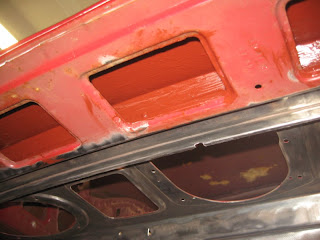
In my last post I moaned about the difficulty of getting my wire wheel into all the tight corners in the trunk...and it didn't get any easier. The picture below shows the passenger side after I had done everything I could with the various wire wheels in my tool collection.
The spaces behind the wheel arches were even more difficult to get at. The next picture was taken quite early on in the process, but you get the idea. I did as much as I could with a two inch wire cup on my die grinder, and then attacked the remaining areas by hand with a piece of sand paper.
After I really had got rid of as much surface rust as I possibly could, I brushed on some Zero Rust and called it done.
Here's the view behind the driver side wheel arch:
I also gave the Zero Rust treatment to the area above the rear of the trunk. I've got big hands (yes, I've heard it), so I couldn't even get my sandpaper into most of this recess - I ended up scrubbing the rust as best I could with a toothbrush-sized wire brush and then painting over the entire area with a brush. I was expecting the painting upside down to be messy - and it was - so I left the clean up of the surrounding area until afterwards.
Next day, with the Zero Rust touch dry I ran the wire wheel over the surrounding area.
Then it was just a matter of cleaning up the rest of the trunk. This picture shows the awful nature of the paintwork in the trunk - it has been painted several times, at least once with some white stuff which looks like tippex! My method of working on a large area with the wire wheel is to first divide the area into sections, and then do one little bit at a time. Mostly the reason for this is psychological, but I also worry about warping the body panels when I concentrate the wire wheel in the same spot for a long time.
I continued the clean up just passed the edge of the trunk and into the interior, as this will make masking off the interior a bit easier when it is time for the primer. You can't see it in this picture, but I also painted Zero Rust inside the shock absorber access openings.
The other tedious place to clean up was inside the trunk lock/fuel filler tube housing. There was actually more crud than rust inside. The places that I couldn't get to with the wire wheel or sandpaper were scuffed up with the wire brush, cleaned with acetone, and blown out with compressed air, repeatedly, until the inner space was ready for primer (this picture dates from partway through this process...for some reason my obsession with taking pictures left me during this part of the project).
The insides of the quarter panels were easily the worst bits to clean up because of all the sound muffler previously sprayed on the surface...one of those things you just have to get on with I suppose.
When the entire trunk was finally devoid of paint I gave it all a good wipe down with lacquer thinner to remove dirt and the residue from the sound muffler - mostly it polished up quite nicely.
I've been told not to paint epoxy primer over ZR - it is apparently much better to go straight to the base coat, but that would not be possible here unless I painted the entire trunk in ZR...and that's not going to happen since ZR doesn't work so well over bare metal...so what to do? Try to mask off the bits I already painted with ZR? Again, not really an option in this case because I want the overall finish to be the best it can be. In the end I settled on scuffing up the previously
painted areas with either 220 grit
sandpaper or a scouring pad, depending on the ease of access..we'll see what happens when the epoxy goes on later...fingers crossed!
The final pre-painting step was to give all the bare metal a coat of metal prep, which I left on for about ten minutes, then washed off with water and a sponge, and dried with a towel followed by compressed air to get the surfaces really dry. The last step took ages because of all the little spaces in the trunk where water likes to hide...no wonder the trunk area is so often rusted out in vintage Mustangs....more to come soon...


POR15 said to scuff the paint before painting. ZR I'm not sure. Alex would know.
ReplyDeleteLooks Great! Those pics are important for anyone else doing the same work. Keep up the great work and blog.
ZR is good to be topcoated with anything that does not contain acetone and I believe that 2 part epoxy primers fall into the category of "ok to use". I haven't had any ZR failures with any of my experiments involving Ospho or DPLF to date. Especially in an area like the trunk that you've cleaned up so nicely, I think you're safe to ZR over rust, scuff, and then re-coat with epoxy primer over all of it.
ReplyDeleteHey Alex - that is good to hear - I am planning to paint the trunk this weekend, so we'll see how it comes out. Thanks so much for your help.
ReplyDelete