Monday, December 3, 2018

the next bit

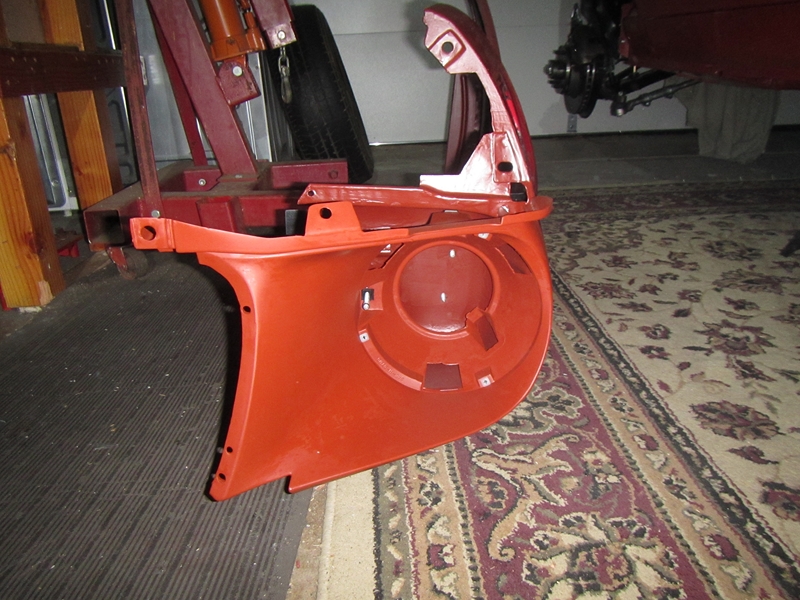
January 2016: with the fenders all restored and back on the car it was time to re-build the front of the car and and finish the wiring in the engine compartment. I started with a Dynacorn front valance - I still have the the original, but it has several dents and some rust and I couldn't be bothered to restore it. The replacement was an excellent fit. I can't say the same for the stone guard - the reproduction part was awful, so it was back to my shed to restore the original.


As usual, the first step was accomplished with a mixture of the trusty wire wheel and some aircraft stripper I had left over from this project.


There were several holes in the stone guard that I didn't really need. I blame whoever installed the 1970's AC. The holes were filled in with the MIG welder and ground down, painted with primer, yada yada...


And it dropped right in! No adjustment required. The picture below was taken a bit later after the front bumper had been bolted on.


I also installed new trim pieces - the originals have irreparable AC-related damage.


I bought a reproduction grille and installed the original trim pieces and my custom GT fog lights with their zinc-plated mounting brackets.


The back bumper was bolted on around the same time. Both bumpers need re-chroming at some point in the future. The rear bumper is also slightly bowed.


At the end of January 2016, Amy and I took an early morning trip to the world famous Turlock Swap Meet, where, among other things, I was finally able to locate the third member I've been looking for all these years. Older readers may recall be interested to know that I have been rolling the car around on a 3.00:1 gear ratio, which just happened to come with the eight inch rear axle I acquired for this project, while searching for something a bit lower....at the right price.

The key here, as often, is price. I was reluctant to drop a thousand bucks on a complete third member when I already had one, and I was quoted a similar amount for a local shop to swap out the gears....so I sat tight and waited.....and then found almost exactly what I wanted (3.40:1 rather than 3.50:1), at a price I could not quite believe.

The following weekend the housing was painted with Eastwood brake gray and installed with a new gasket and some shinny copper nuts and washers that I got from NPD.

Lovely-Jubbly!

Back to work on the engine...I installed the distributor and most of the under-hood wiring was done by this point.


The valve covers had been wrapped up and stored for over three years when I broke them out in March 2016. The export brace came from a Turlock visit in 2011. Installing the brace was seriously difficult but I made it fit.

Looking good...

Looking even better...

Monday, November 26, 2018

repairing the fenders

December 2015: now this is where things went off at a tangent...again! Most of the bodywork on this project was done back in 2011 when I was custodian of a very large garage in Hayward known as the green room. The body shell and most of the parts that will someday be repainted body color were stripped down, repaired, primed with PPG epoxy and treated with body filler (rinse & repeat etc.). So far so good, but when the time came to move garage the trunk lid, hood and both fenders were still in “pre-restored” condition.

And that’s how they remained, for a number of reasons, but mainly because the garage I moved to was too small to set up a welder and a paint gun. Fast forward to the Christmas/New Year holiday at the end of 2015 and I had to decide whether I was going to put a pair of horrible rusty fenders back on my nice clean car....or do something else?

The something else came down to a straight choice between stopping the rebuild to restore the fenders, or replacing them with reproduction parts and getting back on with the rest of the assembly asap. I must admit to a lot of back and forth on this. While Dynacorn™ reproduction fenders are available for less than $150 each through Tony at RPS in Hayward, I was really concerned that they would not line up properly. But then my original fenders were not in the best of shape either and I knew they would take a lot of precious time to restore. Ultimately I decided on restoration of the originals.

Over the Christmas holidays at the end of 2015 I took the fenders off the car and transported them the three blocks back to the shed I built the summer before last. Here is the "before" photo:


I broke out the wire wheel and ground off all the accessible rust and grot from the inside of the passenger fender.


The only seriously damaged area was in the bottom corner at the rear of the fender. This area was cut out with the screaming wheel of death and replaced with new metal using the MIG welder than had been stuck inside a box for the prior four years.


The repaired area was the filled with Bondo™ and sanded, more than once.


A similar repair was made at the inside.


The bare metal was painted with rust converter which was sprayed in the areas I couldn’t get to with a brush. Lovely jubbly.


The unprotected section of the inner side of the fender was treated with a think layer of rubberized bedliner


All these steps were repeated with the driver side fender over the following few days. My shed was too small to work on more than one at a time. When they were both completed, I broke out the replacement fender ornaments I've had in storage for...well years, obviously. The engine has been upgraded from the 200 cid straight six, to the 351 cid Windsor, and I wanted to mark that with the right "351W" fender badges, even though this engine was not available in the Mustang in 1968. Of the four pegs which secure the new ornament, three are in the same place as the originals so I had to drill one extra hole in the fender....better to do this now than after paint!


The original splash guards were in awful shape so I bought replacement parts from NPD and assembled them in my shed.


I installed the replacement splash guards back at the garage:

One piece goes inside the front of the fender...

...and the other attaches to the car body

I also attached the front fender caps which were refurbished and spray painted with epoxy primer way back when.


Finally the fenders were hung on the car and the headlight buckets installed.  Happy New Year 2016!

Tuesday, November 20, 2018

engine parts and cable clutch

Fall 2015: the engine was in, the water and fuel pumps were installed, and the brake system was complete.

Not too shabby

Next up: the radiator. This how it looked in about 2012 when I acquired it from one of my mates in BAMA. I think it was painted either at the last garage or at the Green Room along with most of the other black engine parts.


I have a custom overflow bottle which I painted at the same time along with the side panels which help attach the radiator to the car.


This is how the radiator looked after installation. I had to take it back out later on to do the wiring... 


I may have mentioned earlier that step-by-step photos just don't exist for much of this period, and anyway, most of it was just bolting on shinny new parts that had been sitting in their boxes for a year or more.

bolted on the mini starter

mounted the electronic ignition box at the driver side fender apron 

harmonic balancer with 4-bolt pattern 

one of two inline fuel filters

I had decided to replace the original clutch linkage with a cable. Thankfully for a novice like me, the guys at Modern Driveline have produced a kit which makes it very easy to marry up the cable with the original zinc-plated clutch pedal and my modern Tremec T5 transmission. I also got a replacement speedometer cable at the same time, and I had the gears setup for the 3.40:1 differential.


Installing the kit was easy. The only issue was that I had to remove the master cylinder and disconnect the push rod before I could install the supporting plate. Installing the speedometer cable was a bit more involved. The first one I tried was about a foot too long, so I had to get a replacement, and I had to take the instrument cluster out twice. This was all too tedious to photograph.


This is how the distribution block and proportioning valve looked after the master cylinder was re-installed and the brake system bled....again....


I used a welding rod to figure out the ideal shifter stick position, and then ordered the nearest I could get from Summit.


This is how it looked with my custom handle installed ;)