Showing posts with label rebuild. Show all posts

Sunday, May 26, 2019

glass day

Yes, another post, and this one took place back in in November 2016: With the exhaust system all buttoned up, we were really close to firing up the engine. In preparation, I put the 68 front-first into the garage on its return. But wait a minute....first we had to do something about the windshield and backlite.

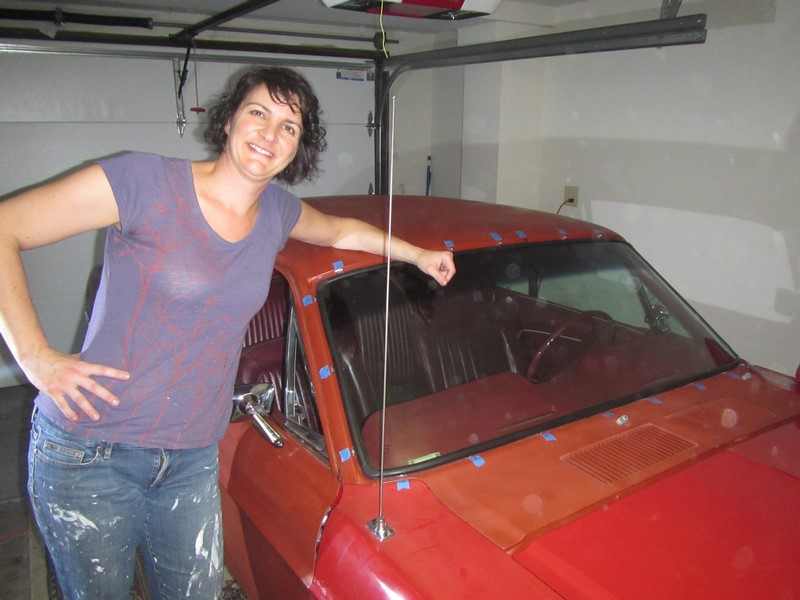
Installing the windshield is a complex process best left to a professional, apparently. Even the BAMA hardcore sub this job out. So, as usual, I decided to have a bash myself, with some help - this is not a task that could be accomplished independently, and I speak as a someone who lifted an engine block onto the bench on my own.

I studied half a dozen YouTube videos in advance, and came up with my own composite method. All the supplies we needed were purchased from Ellis Ace Hardware on MLK. Window seals and a few extra clips came from NPD, and I got a great deal on a replacement windshield from my friends at Mostly Mustangs (also on MLK).

We got started by removing the speakers and the package tray that were installed a year or so earlier (more on this later), and then I laid the new seal on the trunk lid and checked for any damage. Most people lay the seal out in the sun for 20 minutes to warm it up, but we were were doing this in a garage in November so I gave it a light going-over with the heat gun instead.


My assistant gave the original back glass a good pre-install cleaning. We used **** glass cleaner which comes in an aerosol can and produces a white foam; it worked great. The back glass has been moved from attic to basement to garage to attic to garage a few times since I took it out in 2010.


Installed the rubber seal onto the back glass and a bead of **** was laid down in the channel that meets the edge of the glass. Samuel Bear's old Spiderman blanket was a perfect backdrop.


A bead of **** was laid down into channel that meets the edge of the car body. You can add more of this once the window is in place.


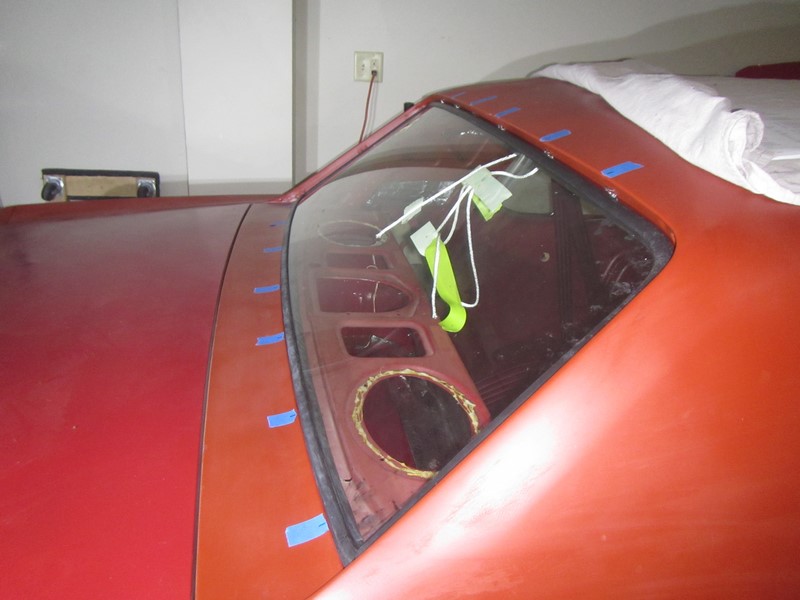
I prepared the opening by installing the clips for the trim pieces and marked the location of each clip with a piece of tape - this is important because you need to see the clips to install the molding, and they are obscured after the window goes in.


This is with the window laid on top of the opening and with most of the bottom edge of the seal installed correctly. We tapped one end of the rope to the inside of the window and hung the other end outside. The rope was very carefully pulled round the perimeter of the seal while the second pair of hands pressed on the glass from the outside.


All done. At this stage we were wondering what all the fuss was about. We took a break and hit up Guido's for lunch.


Came back from lunch and did the same thing with the windshield. This was a little bit more difficult because we were installing a modern replacement (with tinted glass!) and the glass was about a third of the thickness of the original and thus felt much more fragile. I had to be even more careful with the roping-in, but the windshield turned out to be suitably robust.


The inside got a good clean. At this point, the protocol is to add a lot more caulk to the junction of the rubber seals with the car body, however we skipped this step for now as I will probably be taking the windows out again when the car is painted.


Time to put the package tray and speakers back together. When I wrote about customizing the package tray in January 2015, I stopped at the photo below...


The next step of that particular project can now be revealed:


Followed by:


This is how it looked the first time it was installed:


This is how it looks through glass with the rear window trim all put back:


All in all, an excellent day's work.

Sunday, February 8, 2015

mounting the motor

If you remember, I put the 351W back together over the summer (with a lot of help from my buddy Chuck!), but we stopped short of adding the intake manifold and valve covers.


By November these parts were still not installed, but we were ready to install the engine in the car regardless. The main driving force for this was that once again it was time to move garage (and house) and I wanted the powertrain back in before the transfer. A few weeks before the install I acquired a pair of 351W motor mounts from my buddies at Mostly Mustangs and tested the fit with the zinc plated mounting bolts that came with the six cylinder setup.


The lower mounts were attached finger-tight to the cross-member, and the upper brackets were bolted to the engine block according to the detailed instructions from Rich at Mostly Mustangs. Incidentally, on Rich's advice I also enlarged the holes in the upper brackets by about 1/16th of an inch in order to make attaching the engine a little bit easier - this really helped.


The folks at Mostly Mustangs also sorted me out with an appropriate block plate which will replace the six cylinder version. I cleaned up the plate using the previously well-rehearsed wire wheel method.


A couple of weeks went by before the BIG day, and then we got off to a slow start when we had to chase around half of Oakland looking for a cam plug. We also had to take a detour to Chuck's shop to pick up some clutch bolts and an alignment tool (I think the original bolts disappeared with the I6). After that it was straight into the assembly, and I (mostly) forgot to take progress photos. The now-shinny block plate and my high performance flywheel were cake to install and so was the clutch. Incidentally, the clutch was donated by my BAMA buddy James, the same person that was responsible for this project getting off the ground*.


Next we broke out the Tremec T5 that I bought from Chuck about three years ago. I don't think either of us every imagined it would take this long to install it.


Attaching the transmission was actually a real pain, even with a clutch alignment tool. We tried to do it with the engine on the hoist, but in the end we had to lower the block down onto a pallet and slide the transmission and bell housing on that way. We had a minor crisis at this point when we lost one of the bell housing bolts. Fortunately, after my team of four searched every inch of the garage several times, the bolt was discovered in my back pocket. Phew!

Plenty of room in there!

Thanks to Chuck, John and Amy for helping with the install and to Amy for taking photos and somehow attaching the transmission cross-member.


(*It's actually a bit harsh to blame this project on James).

Sunday, January 25, 2015

putting the brakes on

I finally got back to some mechanical work at the beginning of October. Longer term followers of this blog might recall that I had a few problems with my front brake system. I tossed away the six cylinder drum components and replaced them with an old Granada set up that I acquired through the BAMA mafia. Later I found that the the hub size on the replacement Granada rotors was too big for my wheels. This led to me transferring the car from the Green Room to my garage in Emeryville with a pair of Ranger wheels on the front. That was in April 2012, and that's exactly where those wheels stayed for the next two and a half years.

Ranger wheels: not very sexy.

I always planned to take the replacement Granada rotors and have the hubs turned down so they fit the wheels. But I struggled to find a machine shop that could do this for me. Later I talked to Mike Maier about the inadequacies of the Granada swap. A couple of months after that I was in Reno for Hot August Nights when I found myself being dragged into the "Big Boys Toys" exhibition hall, and slowly sucked towards the Stainless Steel Brake Co stand. A few minutes after that one of the Summit Racing guys was passing my credit card though an exceedingly hot swiping machine. It must have been hot, because the credit card was melting when I got it back!! A week or so after that some very heavy SSBC boxes showed up at the house. Around this time I also ordered the roller spring perches from Opentracker Racing that we've all heard so much about.

Roller perch (left) and static stock option (right)

After tearing off the Granada spindles (and all the related parts which I spent time restoring...sigh...) it was straight forward to install the SSBC spindles, dust shields and rotors. It's probably fair to say that the SSBC system is overkill for this car, but I just decided not to make any ecconomies with the brakes.


Getting the caliper brackets and calipers assembled and installed correctly was a bit more traumatic, but I eventually got there. Then I wiggled the car away from the garage wall and did the same to the driver side.

Wheels fit now..!

The SSBC brake system comes with a new master cylinder (MC), flexible lines, and all the hardware. It also includes some short sections of hard brake lines, because the setup requires several modifications to the stock lines. Plus you have to install a proportioning valve (PV) that wasn't needed with the original all-drum system.

One of the reasons for working on the brake system now (and the fuel system next) is that I wanted to get all the lines installed before I put the engine and transmission back in. So I ordered up a set of stock brake lines from NPD and set about attaching them to the chassis. The rear brake lines went in just so, and I made finger-tight connections to the wheel cylinders. Nice. The central line at the transmission tunnel and firewall and the connections at the front discs were also pretty easy. I was able to utilize most of my shinny zinc plated hardware with the SSBC brackets.


I bolted up the MC and connected the brake pedals and the piston. You are supposed to bench bleed the MC before installing it in the car, but I didn't because I only bothered to read the instructions afterwards. At this stage I was a little bit more concerned about where to mount the PV and how to get the lines anywhere near to the MC, never mind connect flawlessly.


Of course there was no distribution block included with the SSBC kit, so I had to dig out the original and refurbish it. That's one more time that keeping EVERYTHING from the tear down has saved me.

That's better

I guess it also goes without saying that the brake lines that come in the SSBC kit have completely different connectors to the ones that come from NPD. And they're not quite the right shape, and anyway I've never had to make custom brake lines before, so why not now? Well the answer to that questions is probably "because it's a tedious PITA!" First I had to invest in a pipe bender, and then a flaring tool, and then in some extra brake lines from the local parts store, and then some more spare brakes lines...and...well when it was all done it looked like this:


Now to me it wasn't too bad for a first time, but I know for a fact that some of the flanges are not right, and that a lot of the bends look amateurish. For now though, it's a start.

To be continued...

Friday, February 21, 2014

engine rebuild spec

The 1969 351W I've been working on for this project has come a very long way since I first set eyes on it back in July 2011. For a start I had to transport it back to the Green Room, where it sat for about nine months before I moved house. After that another seven months ticked by before I started the tear down on my birthday in 2012.

Martinez, California, July 2011

I took the stripped down block to Stirtz Machine in Oakland for magnaflux and integrity testing. The guys at SM are real old school.


On the weekends, they build their own racing cars.


The block came out all sparkly, and the cylinders only needed basic honing - very fortunately because the block has already had an extra 40 thou hacked out of it and anything more than a honing would have been terminal.


After the block passed, I went back to Stirtz and dropped off the heads, pistons and the crank shaft and left the oil pan and timing chain cover for clean up. I also had Carl balance the crank and grind the pistons to uniform mass. I'm pretty sure that I also asked the guys to "sort out" the heads, and although they did give them both the magnaflux treatment, I got the impression that nothing else was needed....so I took everything back home and painted it all red. (Except the crank. And pistons).


It's been a while since the odor of red paint dissipated from the garage, and while I've been making progress in other areas, the motor has been sitting on the stand, providing me with somewhere to stack miscellaneous small items. I've probably mentioned that I've been "narrowing down the spec." in half a dozen or more posts, but the truth is, I've found this process very difficult - which is why it's taken so long. I mean figuring out what cam to buy was tough, and that's just a case of looking at some data. I'm not building a track car, so I don't need anything too wild. (I actually settled on this one from Comp Cams).

Even it my days as a professional scientist I *hated* doing any kind of background research, and it was no different with learning about engine components. When it came down to figuring out spring pressures, retainer styles, guide rails, screw-in studs and yadda yadda....I was about ready to die from lack of interest. This might sound like heresy to most "car guys" but that's how it was. The minutiae of the mechanical aspects just don't do it for me when compared to rust removal or installing a wiring harness. If I could have waved a magic wand at the Summit catalog and had the engine gods assemble my parts list I would have. So, after months of procrastination (and, let's be honest, stockpiling some $$$) I called on my BAMA buddy Chuck and handed over my credit card.

We started off by inspecting the heads, and the first thing Chuck told was I needed a valve job and some replacement valves. So more machine work in other words. This might not sound too bad, but in the seven months since I collected my engine block, Stirtz Machine closed its doors for good after Carl retired. I called S&S in Hayward, but after informing me that "we're not taking no more heads right now" the bird at the other end hung up on me! Still, we put this little snag to one side and spent a couple of hours figuring out exactly what parts I needed to go with the cam. Or Chuck did really. I mostly just listened. I've always gained a much richer understanding of something from fifteen minutes with an expert than I ever did spending hours reading.

The spec. I finished up with was designed around the Comp Cams CCA-CL35-416-3 Cam and Lifters set (Hydraulic Flat Tappet). I bought compatible Comp Cams rocker arms, valve springs and retainers, valve locks and valve stem seals. I also bought new ARP main and head bolts. For the rest of the rebuild I picked up some Comp Cams push rods, a full set of Felpro gaskets, replacement main (std) and rod (-0.10) bearings, piston rings, and a Melling oil pump with a new driveshaft and a Comp Cams timing chain and gear set (Magnum Double Roller no less!). I also splurged on a pair of Hedman ceramic coated shorty street headers. The metallic gray coating goes really well with my aluminum intake manifold and the zinc-plated accent pieces I'll be installing in the engine bay.  We decided not to order valves just yet pending consultation with the machine shop...assuming I can find one!

Lots of boxes like this in other words

Ahhh...headers :)

This is probably a photo too far....