Showing posts with label firewall. Show all posts

Thursday, January 2, 2014

the Painful wiring harness

I think I always knew that I would end up buying a completely new wiring harness for the '68. The fact that it sucks so much more $$$ into a pretty deep black hole meant that I considered making my own, and I was in fact encouraged to do so by a couple of the guys from Vic Hubbard....but in the end I decided to lay down for a new one. The choice came down to the overly-hyped Painless kit for $$$ or the OEM harness that NPD sells for about 30% more $$$. In the end I went with the advertising and splashed out on the Painless kit. I'm not sure this was the correct decision (some aspects of the installation are decidedly Painful!), but at least it was the (slightly) cheaper option.

Seems a lot of $$$ for what you actually get

I started by laying the new harness out on the floor next to the old one. It seemed to be similar, but it was also clear that I was going to have some work to do with my crimping tool and the box of connectors that came in the kit.


Laying the harness in the space behind the dash is straightforward, and the kit includes two correctly sized grommets which facilitate smooth passage of the engine compartment loom through the firewall.


The first thing to do is to secure the fuse box in the stock location. The shape of the fuse box is different to the original, so installation requires drilling two new holes in the firewall. Suitable sheet metal screws and included in the kit. When I was happy with the location of the fuse box, I dug out my replacement firewall pad and installed that too (you can see the pad in some of the later photos). The original pad was actually in pretty good shape, so I hung onto it and used it as a template - the reproduction pad requires a few adjustments - but it was nice to throw it away.


The kit comes with a decent instruction manual, and each individual wire is labeled and color coded which helps a lot with the basic layout...but it's difficult to make specific connections without something to connect to. So the wiring installation quickly expanded to include most of the under-dash components too. The first item was the windshield wiper motor operating arms, wiper motor and mounting bracket. The motor casing was restored at the same time as the heater motor and finished in Eastwood brake gray. The mounting bracket got the black Dupli-Color. Mounting hardware was zinc plated...about two years ago.


Next up: the heater, plenum chamber and defrost hoses. Installing the heater through the firewall (and the pad) is a simple operation with two people...and a triumph of desire over gravity on your own. As usual I took the latter route. I think my general method of doing stuff the hard way is driven by the feeling of accomplishment I get on completion.


The kit is designed to fit in the stock wiring location(s), which means the heater motor connection looks like the picture below (albeit without any sleeving on the wires). It's been so long since my car had any wiring installed that I'd forgotten how messy this looks. I certainly couldn't leave it like this. At this point the wiring harness was only loosely installed, so there was enough wiggle room for me to relocate the wire to a small hole I drilled in the firewall at the other side of the heater motor. I also used a cable clamp which I attached to the firewall with the lower heater attaching bolts. I also put some heat shirk sleeving on the wires. The only downside to this little operation was that I had to take the heater out before I could move the wire....so I got to do that tricky solo-heater-install twice.

I like my version better

After the heater was installed re-installed, I connected the control cables and carefully snaked them between the heater case and windshield wiper motor. I took a lot of photos of the under-dash area before and during the tear down, so it was easy to get the cables into the stock location.


The heater control panel was refinished by hand with some Sign Painters 1-shot lettering enamel that I got from Eastwood. The other bits were zinc plated. I also re-painted the letters on the control keys.


Next to go back was the ignition switch, headlight switch and the ashtray/cigarette lighter. I'll be doing some custom wiring in the glovebox later on for my cutout switch and USB connections, but I also want to have the stock look where the original lighter is functional.

I'm loving my zinc plated lighter surround

Once all this stuff was in situ, I felt confident that I could tie down the precise location of the harness and start making some of the connections. I was really expecting my expensive wiring harness to be plug and play, but in fact it was far from it. For a start the steering column connector bares little semblance to the original, necessitating the use of an additional connector and the original plastic connectors. Which is fine if your stock parts are reusable.....and fortunately mine were. Same goes for the connectors for the door jamb dome light switches and the cigarette lighter connection.


The other thing missing from the Painful kit is any form of alignment plugs like the original Bakelite fittings.


This leads to a lot of connections that look like the one below. I can't help feeling that the OEM style connectors are more robust.


Installing a wiring harness is always going to be a time consuming part of the project, and I really made sure I did take my time. Once all the important connections were made and I was completely happy with the location of the harness I completed the installation of the hanging brackets and cable clips. I also wrapped each section of the harness with scotch tape to add stability. This process involved a certain amount of disconnecting wiring and the removal of some items, although fortunately not the heater box. This was actually one of the most enjoyable parts of the project so far. I love re-assembly!
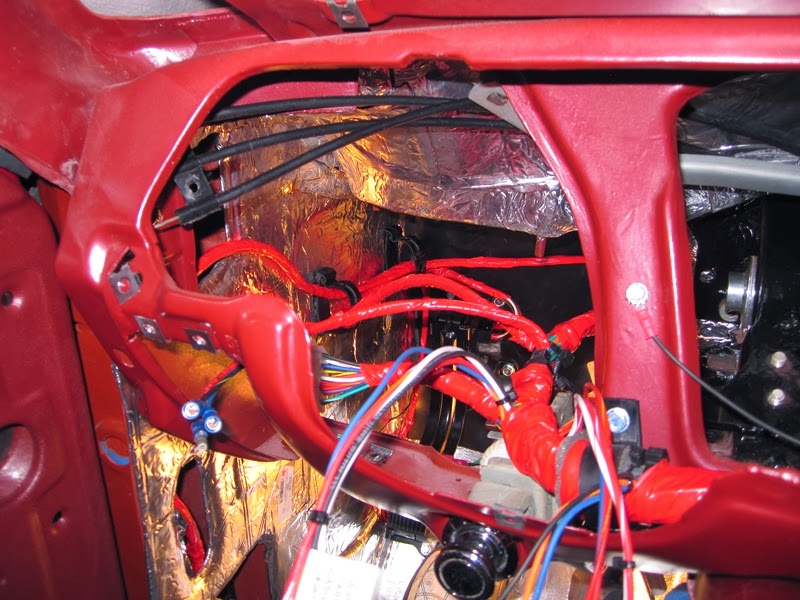
Time consuming but fun

The ventilation duct was another very difficult install

The wiring below the dash is not complete, but I've gone as far as I can for now. I still have the trunk area and of course the engine compartment to do. I'm currently looking at custom layouts for the latter.


At some point during the wiring install I got fed up of dropping tools through the openings in the floor pans. I taped over these once before, but this time I just re-installed the floor plugs. I know these holes are not for drainage, because they are not located at the low points in the floor pan...not to mention that they are also both too big and they are sealed up. I've heard a suggestion that they are alignment holes for use at some point in the body building process, which sounds more likely. Any other suggestions are welcome.

Thursday, August 2, 2012

into the black

I was really happy with how the trunk came out, and I still had the garage covered in plastic, so next up was the engine bay. This area was painted with epoxy a little while back. I started the latest bit of masking by carefully covering up the read paint in the trunk area, and then I peeled back the covering at the front of the car.


I was careful also to cover up the floor where I previously painted clear coat.


I read a really useful article in Mustang Magazine about types of paint to use on the engine bay, and I settled on Dupli-color DE1635 Engine Enamel which is freely available at Kragen. Provided you mix (shake) the cans properly, this paint goes on great and is very affordable. I started on the outside, although I think it would have been easier the other way round, and all subsequent coats of paint were applied to the inside of the engine bay first.


All told I need about 3-4 coats to be happy with the coverage over the epoxy primer. However, a certain amount of sanding drips and sags in the paint followed by re-applying was needed before I was happy with entire area. Also, applying paint from a rattle can underneath the engine bay was a little bit challenging.

Took a bit more paint than I initially imagined...

So, time to unmask the body shell then? Well not quite actually. While I still had the most of the body masked off I took the opportunity to spray some rubberized coating into the rear wheel wells.


I also handed out the same treatment to those areas behind the fenders where road damage usually has the highest impact.


Here's how the body shell came out after I removed the masking and cleaned up the garage.

Monday, February 28, 2011

fixin' up the firewall

So the original intention with the passenger compartment (or interior if you prefer) was to start by lowering the seat platforms, and then go over all the surface rust with the wire wheel before painting the entire area with epoxy primer. But as usual on this project, things didn't really work out according to plan. For a start, I found that constantly opening and closing the doors was too much hassle, so I took them off...and then got sidetracked into stripping the paint etc.

Then, after starting to work on the rear portion, I found a lot more surface rust than I was expecting, and the grinding began to drag on...eventually I started to worry about leaving the bare metal exposed too long. It's a difficult one, because the climate in the Bay Area, especially this year, is really mild - I don't think the temperature has dropped below 65 F in all of January, and humidity levels are really low....but then nothing stops rust like a coat of epoxy primer, so in the end I paused in the grinding process and sprayed primer at the rear.

The front of the interior was much more complicated than the rear: all the dash to work around, the inside of the upper A-pillars to clean up, and then of course there were the repairs I needed to make to the sheet metal. I took out the ugly 70's aftermarket ac back in May 2010, but at the time I didn't realize how much damage the PO or installer had done to the firewall and the passenger side foot-well. Here's a shot of the firewall from before the ac or heater was removed - apart from the horrific overuse of caulking, it doesn't look too bad.


However, after I removed the heater and ac hoses, I could see there was some distinct damage to the firewall.


Here's the view from the inside of the car before I scraped of the caulking:


There were also several holes in the passenger foot-well, and in the transmission tunnel.


Once I got rid of all the caulking, it was good news: although the firewall has been cut, the hose opening has been enlarged by bending the extra metal upwards and out of the way - bending this back into place and welding up was a much less frightening prospect than fabricating a replacement piece.


I started out by grinding the paint of the inside of the firewall with my wire wheel, which made it all look much better.


The next step was to bend the metal back into place, which I achieved with a pair of pliers (!) followed by hammer and dolly work - the heater hole was just big enough for me to reach a couple of fingers inside and hold the dolly while I stood in the engine compartment; this would have been much more difficult, if not impossible, with the engine still in place. I was able to get the metal close to where it should be by this method.


I clamped a 1/4 inch piece of copper across the join - this serves a dual purpose since it holds the firewall straight and also acts as a heat sink for the welds.


I put the first welds down on the inside, and then did a little bit more work with the hammer and dolly to straighten up the edges of the firewall openings. The copper heat sink was then clamped on the inside, and additional welds added at the engine compartment side.


This is the view after the welds were cleaned up. A proper cleanup of the firewall and the rest of the engine compartment will have to wait for another day.


The ac installer also left three holes in the passenger side floor pan, where the system was vented. I think the smallest hole (arrowed below) was probably a mistake or a test hole as it was not actually used.


Starting with the hole in the transmission tunnel, I cut a small piece of 20 gauge steel and held it underneath the hole so I could trace the exact shape with a sharpie - I was just able to squeeze my arm though the shifter opening in order to do this.


After trimming with some snips I had a octagon-shaped patch while I filed down until it was a very close fit with the hole.


Here is the patch being held in place by a piece of masking tape on the underside. I was just able to reach to hold the copper heat sink under the patch while I welded it up with the MIG.

The first patch after cleanup

The other two holes were too far away to reach to from inside the car, so I stuck a piece of masking tape underneath and colored in the holes with my sharpie. I then used this pattern to cut out patches from the steel sheet. The smaller hole needed a bit of filing first to make it closer to a circle; I also had to bend the patches slightly to fit the contours of the floor.


This time I had to tape the heat sink to the underside before I welded up the patches.


The inside after cleaning up with the die grinder:


A little bit of cleaning up was also needed on the underside to get everything nice and smooth, and then I called it a day.