Showing posts with label body. Show all posts

Thursday, August 2, 2012

into the black

I was really happy with how the trunk came out, and I still had the garage covered in plastic, so next up was the engine bay. This area was painted with epoxy a little while back. I started the latest bit of masking by carefully covering up the read paint in the trunk area, and then I peeled back the covering at the front of the car.


I was careful also to cover up the floor where I previously painted clear coat.


I read a really useful article in Mustang Magazine about types of paint to use on the engine bay, and I settled on Dupli-color DE1635 Engine Enamel which is freely available at Kragen. Provided you mix (shake) the cans properly, this paint goes on great and is very affordable. I started on the outside, although I think it would have been easier the other way round, and all subsequent coats of paint were applied to the inside of the engine bay first.


All told I need about 3-4 coats to be happy with the coverage over the epoxy primer. However, a certain amount of sanding drips and sags in the paint followed by re-applying was needed before I was happy with entire area. Also, applying paint from a rattle can underneath the engine bay was a little bit challenging.

Took a bit more paint than I initially imagined...

So, time to unmask the body shell then? Well not quite actually. While I still had the most of the body masked off I took the opportunity to spray some rubberized coating into the rear wheel wells.


I also handed out the same treatment to those areas behind the fenders where road damage usually has the highest impact.


Here's how the body shell came out after I removed the masking and cleaned up the garage.

Sunday, July 15, 2012

into the red

What color to paint your car? It's a tough question, in fact one of my friends from BAMA agonized for two years before settling on the merlot jewel metallic paint job you can see below for his 65 fastback. For me it was a decision I made before I bought my car: I was never intending to repaint (or restore...) the car originally, so I chose what I wanted and bought that car. However, when you have everything back in primer, it's tempting to think about alternatives. I considered for a while changing the shade of red to something lighter or more orange, but that probably wouldn't have worked so well with the maroon interior, so I've decided I'm sticking with the original Ford Candy Apple Red (note: this is a solid color and not a candy-style paint job). The one thing that will be going though is the naff white roof my car had when I acquired it.


I'm still not decided on whether I'll be painting the entire car myself, although I'm leaning towards it, but I will be doing the jambs, underside of the hood and deck lid, and inside the trunk. I mentioned in my last post about how converting my garage into a paint booth takes a lot of effort, so I decided I would do a bit more than just the epoxy primer. I picked the trunk as my starting point because I wanted to have a go at spraying urethane base coat/clear coat somewhere where it doesn't matter - most of the trunk will be covered up with mats, spare wheel etc, so I couldn't really go wrong. A lot of the car was already masked off from painting over the new body work so I just had to expose the trunk and seal it off from the rest of the car.


It doesn't show that well in the pictures, but before I started painting I scuffed up the trunk real good with a scotchbrite and wiped down with denatured alcohol. Then I laid down a thin coat of PPG DP74LF red oxide epoxy primer which I mixed 2:1 with DP401LF activator as usual and then added one part of acetone (so a 2:1:1 overall ratio). While the primer was flashing I mixed up the urethane base coat: I used PPG DBC "K" Color to which I added DT870 medium reducer in a 1:1 ratio. I sprayed on two coats with a 45 minute flash time. I followed up with two coats of urethane clear made up of four parts of DCU2021 with  one part DT870 reducer and one part DCX61 urethane hardener (4:1:1). It came out really well with just a few (mostly inconspicuous I hope) runs.


At the same time I did a bit of work on the gas tank. Started by masking off the top side:


Then I scuffed up the underside and sprayed on a very thin layer of epoxy primer and two coats of clear coat. This look will match the underside of the car.


I let the clear coat harden overnight and then masked it off before scuffing up the topside/trunk floor.


The top side got the red base coat as well as the clear because I want it to match the trunk, even though it will be mostly covered up. This came out really nice without any runs. So happy with my choice of color!

Sunday, June 24, 2012

blowing hot and cold

Yay! Finally done with the welding. However, what I did discover after a couple of goes at patching the quarter panel was this: no matter what you do, when you do this much welding, some warpage of the sheet metal is inevitable. So, the next step was to do what I could to improve the situation with my body hammer and dolly. The answer is not much! In fact, the first thing I did was make the situation worse by stretching the seam and developing an "oil can" effect in the metal. Great.

I did some research on the net, and conferred with Sven (thanks again!), and I discovered that the modern method of dealing with stretched metal is a shrinking disc. The old fashioned method meanwhile, is to heat up the metal with a propane torch, and then rapidly cool it with a wet rag. The rapid cooling causes some shrinkage of the metal, which, after several applications, should be enough to eradicate the oil can effect. For me, the big problem with the shrinking disc was availability. I was trying to get going on the project and it would have taken me a week or so to acquire this tool....so I drove over to Home Depot and laid down fifteen dollars for a propane torch. I already had the wet rag on hand.


The metal shirking was actually a lot more simple than I thought it was going to be, and after a couple of hours of heating and cooling....and body hammering....and repeating...I was happy enough to start roughing up the surface ahead of the body filler.


After I got done with the body hammer I painted over the inside seam with some Zero Rust and then covered the entire area with seam sealer.


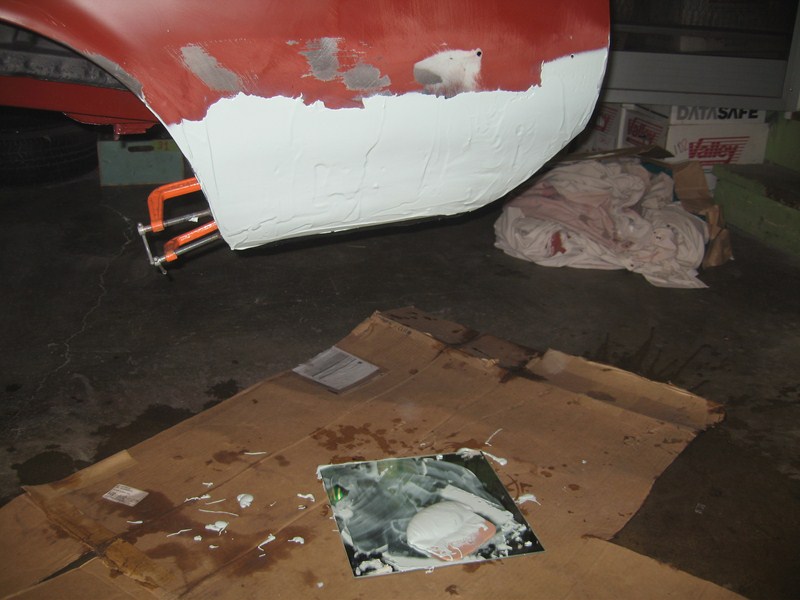
Here's my first bash with the body filler.


It quickly became apparent that (i) there were still a TON of high spots and (ii) I was going to have to skim the entire quarter panel.


Take two with the body filler. This is easily the most filler I have ever mixed up at one time. Good thing I bought a gallon of filler.


Getting there now, but still several more high spots to deal with.


Finally got it as good as I possibly could and ready for primer.


But...hold it right there! Before I got out the compressor and converted the garage into a paint booth, I wanted to prep a few of the other small parts for primer. I actually quite like the painting, but the biggest part of it is getting the garage ready....so, when the garage is in paint booth mode, I like to paint as much stuff as possible. I collected together all the parts that will (eventually) need to be painted body color that I had not previously worked on....except the hood, deck lid and fenders that is...and stripped off the thick, eggshell-like paint. This is quite easy with the aircraft stripper I usually use.


The fender extensions/headlight buckets were a bit more difficult to strip.


After stripping I gave everything a REALLY GOOD going over with water to neutralize the stripper, and then sanded everything to 120 grit.


Time to mask off the parts of the car than I didn't want to paint. I was taping off almost the entire car, so I did some of the masking with decorators plastic sheeting. This worked quite well as long as I used several layers and taped the sections together.


Allowing access to both sides of the repaired area meant the masking was a little bit more of a challenge, because I couldn't just close off the entire trunk/interior area. Also, I wanted to make sure there was no over spray on the underside of the car since that area has been declared finished.


The quarter panel got the usual epoxy primer treatment: two coats with about 20 minutes flash time.


I had plenty of primer left to lay down two coats on all the small parts too.

Monday, June 11, 2012

patching the quarter panel a second time

It was always my thinking with the Canadian patch that if it works great.....and if not, it's great practice before I cut up an expensive Dynacorn panel. It's annoying that Dynacorn don't sell a patch panel, but there's no question about the superior quality of what they do sell. While I was at it, I ordered up the outer wheel arch so I could patch that too.


Here's the car after suffering a second attack from the Killer Kutting Wheel. I cut out the lower couple of inches of the wheel arch at the same time.


I chopped a larger-than-really-necessary chunk off the replacement outer wheel arch, and then spent what felt like a long time trimming, fitting, and putting a flange on the patch.

view of fitted patch from inside the trunk

clamped

welded...mostly.

OK, so onto the main event. Everyone I know hates using the cutting wheel, but chopping up an expensive $$$ body panel - and then discarding 80+ percent of it - adds a new dimension to the pain.


Another heavy bout of back-and-forth fitting the replacement panel eventually led to a much smaller piece which I flanged with my homemade pliers.


This time I used Clecos™ to secure the patch instead of sheet metal screws, which was much more satisfactory.

many hours later....all welded up

After the welds were ground down I was much happier - I'm quite sure it would not have come out this well if I hadn't practiced first with the Canadian patch panel (or had so much help from my blogger friends!) Now, back to the body filler!!