Showing posts with label windshield. Show all posts

Sunday, May 26, 2019

glass day

Yes, another post, and this one took place back in in November 2016: With the exhaust system all buttoned up, we were really close to firing up the engine. In preparation, I put the 68 front-first into the garage on its return. But wait a minute....first we had to do something about the windshield and backlite.

Installing the windshield is a complex process best left to a professional, apparently. Even the BAMA hardcore sub this job out. So, as usual, I decided to have a bash myself, with some help - this is not a task that could be accomplished independently, and I speak as a someone who lifted an engine block onto the bench on my own.

I studied half a dozen YouTube videos in advance, and came up with my own composite method. All the supplies we needed were purchased from Ellis Ace Hardware on MLK. Window seals and a few extra clips came from NPD, and I got a great deal on a replacement windshield from my friends at Mostly Mustangs (also on MLK).

We got started by removing the speakers and the package tray that were installed a year or so earlier (more on this later), and then I laid the new seal on the trunk lid and checked for any damage. Most people lay the seal out in the sun for 20 minutes to warm it up, but we were were doing this in a garage in November so I gave it a light going-over with the heat gun instead.


My assistant gave the original back glass a good pre-install cleaning. We used **** glass cleaner which comes in an aerosol can and produces a white foam; it worked great. The back glass has been moved from attic to basement to garage to attic to garage a few times since I took it out in 2010.


Installed the rubber seal onto the back glass and a bead of **** was laid down in the channel that meets the edge of the glass. Samuel Bear's old Spiderman blanket was a perfect backdrop.


A bead of **** was laid down into channel that meets the edge of the car body. You can add more of this once the window is in place.


I prepared the opening by installing the clips for the trim pieces and marked the location of each clip with a piece of tape - this is important because you need to see the clips to install the molding, and they are obscured after the window goes in.


This is with the window laid on top of the opening and with most of the bottom edge of the seal installed correctly. We tapped one end of the rope to the inside of the window and hung the other end outside. The rope was very carefully pulled round the perimeter of the seal while the second pair of hands pressed on the glass from the outside.
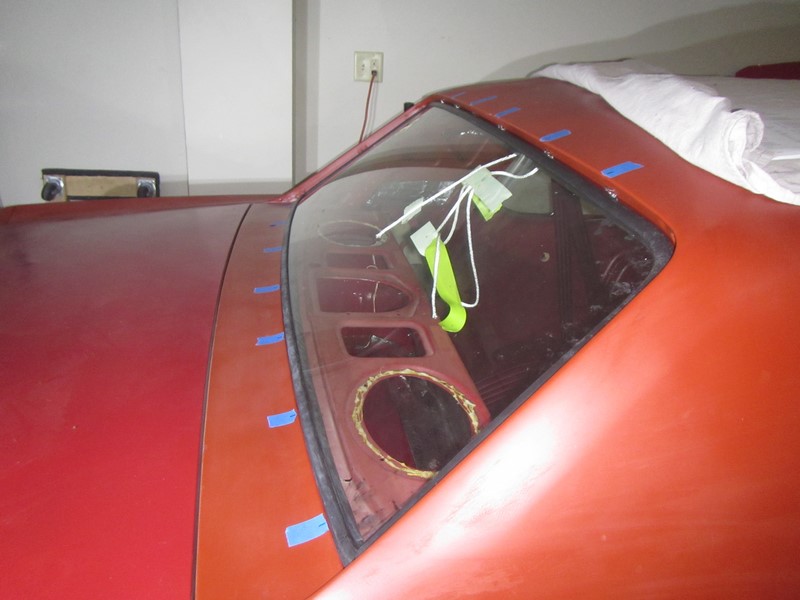

All done. At this stage we were wondering what all the fuss was about. We took a break and hit up Guido's for lunch.


Came back from lunch and did the same thing with the windshield. This was a little bit more difficult because we were installing a modern replacement (with tinted glass!) and the glass was about a third of the thickness of the original and thus felt much more fragile. I had to be even more careful with the roping-in, but the windshield turned out to be suitably robust.


The inside got a good clean. At this point, the protocol is to add a lot more caulk to the junction of the rubber seals with the car body, however we skipped this step for now as I will probably be taking the windows out again when the car is painted.


Time to put the package tray and speakers back together. When I wrote about customizing the package tray in January 2015, I stopped at the photo below...


The next step of that particular project can now be revealed:


Followed by:


This is how it looked the first time it was installed:


This is how it looks through glass with the rear window trim all put back:


All in all, an excellent day's work.
Monday, October 21, 2013

getting glassed

It feels like every post for the last six months has included some mention of how slow progress has been. This one's different. The engine coming back from the shop has really spurred me on to get the car running again. I mentioned a while back that I started installing sound/heat insulation at the firewall. It was always part of the plan to put this material pretty much everywhere, but the next place I worked on was the doors. I started at the driver side. Once the insulation was done I installed the door handles and the rest of the locking mechanism. I was surprised how easily this all went back.

Dead-End Door
the guts of it...
Popped on the handle and locks etc.

So now I wanted to put the three side windows back in, starting with the quarter window. The various parts house make it easy to gather all the needed facsimile rubber seals and trim parts...except one: the seal around the glass at the quarter window. This is a shame, because mine needed replacing. You can buy the entire quarter window assembly, but I didn't fancy doing that just to get a $2 seal. My guess is that the reproduction unit is assembled using some type of modern adhesive/sealant which sets after the window pane is inserted into the frame...and therefore can't be sold as a discreet item. At times like this I usually call on my buddies at Mostly Mustangs in Oakland. They can always source good used parts, and this time they came up with a pair of very nice windows from a recently totaled 67.


The guys actually let me pick the car over for for choice parts. I ended up with an "interior decor kit" which I plan to partially customize and a pair of trunk springs amongst other items.

I even got to rummage through this lot!

Back in my garage I liberated the window seals and gave them a good cleaning up.


Assembly of the window is easy - no adhesive is necessary since the seal fits pretty tight inside the frame when it's all screwed together.


It took a bit of patience, but I got the quarter window back in without doing any damage and the window goes up and down when you turn the handle. Which it didn't before incidentally. Getting the window, winder mechanism and all the stops back in the door and all lined up is a bit tedious, but I managed it with help from a copy of the Ford Assembly Manual - this tome is very detailed and I've used it a lot already. I started off with a pdf version, but I eventually paid for a bound reprint, and it was really worth it. Sometimes you just can't beat paper!


Re-installing the vent window and main window was even more involved, but I got there. When I took the windows out (in May 2010!) I honestly thought I would never be able to put them back together. A good set of tools helped, but sometimes you just can't beat experience!


After that, I rolled the car outside the garage for the first time in eighteen months, turned it round, and rolled it back in. Then I (eventually) installed inner-door soundproofing and side windows at the passenger side.

Saturday, October 16, 2010

should I stay or should I go?

You have got to let me know. Well, no you don't actually, because it's already over, and the answer was "GO". If you're wondering where this is heading (cough), it's a long story...isn't it always...which started back in June when I took out the windshield. Removing the front glass was a straightforward decision: it made accessing the dash area way easier while I was tearing that all down, and it had to be replaced anyway due to a couple of huge chips. So the windshield was pulled out and stored in the basement...where it will probably stay for a long time after the car is back on the road.

The backlite meanwhile was a much tougher customer. Literally. The original plan, after very little consideration, was just to pull it out too. Back in June I started trying to get the trim off the rear opening. Like the front, I followed Mark Stang's video for removing the trim - except it was much harder to do at the back. The side trim pieces are held on with screws...easy enough...but (as it turns out) the rear window trim clips are a slightly different shape to the front, and much harder to "pop off" as it were...except I didn't know that until later. So the backlite just got left in, while I asked around for help removing the trim...only I never did. It was always on my "to find out about..." list, but never made it to the top.  So the car sat like this for about four months while I worked elsewhere.


Recently a couple of different friends have been giving me the 'if it aint ripped, leave it' mantra about the headliner, and with the back window still in situ, this was starting to make sense. I mean the headliner wasn't ripped or torn at all, the only defect was some minor fading (darkening) everywhere but behind the sun visors. So I left the backlite and rear window where they were. When I started on the trunk area, I was planning to work around the rear window as far as I could. This went very well for a while (more on this later), but then I took a peak at the inside of the C-pillars behind the headliner...and I quickly realized the headliner and rear window had got to come out. No question about it.

So...I set to work at the top strip with a variety of trim removal tools I got from Eastwood. It was not easy, but after wiggling various objects around under the edge of the trim, I managed to get two clips loose at the passenger side. Then I just slid the trim all the way out. I would not recommend you try this, but I managed it somehow, and without damaging the trim or the bodywork. Phew. Unfortunately, nothing I tried could get at the clips holding the lower molding. So I tried a different approach: I cut off the outer edge of the rubber backlite gasket with a razor blade, and pushed the glass out from the from the inside. It was a cinch to do. The only problem was I found myself standing in the trunk area holding the glass. I somehow wiggled myself and the glass out from under the car (it is still on stands at the back). After this delicate operation, stashing the backlite in the basement was the easy bit. A replacement rear window is $$$ not to mention the $$$ for shipping, so this will definitely be going back later. With the glass out of the way, getting the lower piece of trim out was no problem.


The opening was filled with the usual mixture of dead leaves and general grot that I have become accustomed to while taking this car apart. Most of it when straight up my vacuum.


Onto the headliner then. Mostly the removal was so easy that I neglected to take any photos - just a matter of popping out the bows at one side first and working front to back. Then I found the thin wire hangers above the backlite opening...these were really tough to get out, and in fact I ended up tearing the headliner in the process. I dread to think how I am ever going to replace these little hangers.


Here's the headliner after I got it out. The patches at the front are closest to the original color.


The underside was heavily water stained around most of the perimeter. This picture was taken before I pulled out the supporting bows, which fit inside tightly sewn tubes in the material. Due to the shape of the bows it was impossible to get them out without destroying the stitching - it just seemed to disintegrate. I think the age of the headliner fabric and stitching was a big factor in this - I certainly hope so, as the bows will have to go back one day and I don't fancy sewing them in.


The first thing I noticed about the bows was that several of the ends were covered with red over-spray - isn't everything on this car! The second thing was that they are all slightly different sizes and shapes. The golden rule with parts like this is simple: make some notes. In the digital age, a quick picture is mandatory, and it also helps to draw a quick sketch. This should take some of the stress out of installing the new headliner...although I have been told it is a total PITA.


This is a picture of the surface rust on the inside of the driver side C-pillar. The other side is very similar. A quick glance at this when I peeled back the headliner and I knew I couldn't leave it as it was. Fortunately there are no serious rust issues, and unlike one of the guys in BAMA, I didn't suddenly discover any homemade sunroof-related horrors.


The yellow insulation I found under the roof was the same as the piece I pulled out from under the backseat. I'll be replacing all this later with some modern material.


The perimeter of the roof had surface rust all the way around - not really much of an issue, I just have to figure out how best to treat it.

Wednesday, June 16, 2010

and now the windshield is gone

Removing the windshield has been an ongoing process which I finally completed the other night. I got the trim off a few weeks ago, but I only recently found somewhere to actually store the windshield (in the basement, since you asked). Getting the trim off around the window is a real chore, as has been well documented on VMF, but I was still keen to do it myself. When I was asking around for advice, one of the guys in BAMA told me to "get a glass guy to do it." After that I was determined to do it myself.


The primary resource for windshield removal is this film clip by Mark Stang. The only thing I can add is that if you don't have the molding removal tool shown in the film, then you can make one out of a paint can opener...it just takes a bit of time at the grinding wheel.


Once the trim was out of the way, I was shocked to discover just how much crud was underneath the molding...a lot of bits of dead leaves mixed with who knows what. I started by trying to scrape it out with a small piece of plastic.


Pretty soon I had to stop and tape up the cowl vents - no point making more work for later...


Next I scraped out a layer of old rubber sealant or something similar - it had the consistency of that stuff on the bottom of a mars bar


I've read a lot about using a piano wire to cut around the windshield gasket, but I couldn't really see the point - I just cut through the outer side of the gasket with the blade from a Stanley knife and then pushed out the glass from the inside. You have to work your way around the top edge and the sides of the windshield, pushing gently on the glass to break the seal; the screen should then lift out.


It's quite satisfying that I got the windshield out entirely on my own without breaking it, or even nearly breaking it. After all I've read, it was quite easy and I may even have a bash at putting the new glass back in. I am 99% certain I'm not putting the original glass back in as it has a couple of huge half dollar sized chips and several scratches from the wipers. I'm hoping to reuse the backlite as that is in much better shape.


Inside the gasket is a load of sealant type gunk, which has to be scrapped out. I was stealing myself as I poked around the lower edge, as I expected to find rust in this area. Fortunately there wasn't any. Yay!


I was busy admiring the inside edge - a bit of peeling paint, but otherwise what looks like perfect metal underneath - when I noticed...a PHILLIPS SCREW holding in one of the trim clips!! Hello!! How did that get there...oh I see...of course, the windshield has been out before...Now lets get this straight: I have NO problem with this car having been well looked after and previously restored - far from it....but so much of it doesn't make sense.....

Thursday, May 27, 2010

wipers & wiring harness

In order to properly treat the surface rust under the dash I needed to remove as much of the inner workings as possible. Next up was the windshield wipers and the internal mechanism. The exterior wiper blade arm is easy to remove - as long as you know exactly what you are doing! I researched this on the VMF forum, and decided to try the claw hammer method. First you have to lay some towels or similar padding over the cowl area to prevent damage. Then position the claw of your hammer under the wiper arm and gently pry upwards.


If you take your time this is a straight forward way to remove the wiper arms.You can then remove the wiper motor and mechanism from below the dash.


Next it was time to remove the wiring harness. There are two clips in the front of the area behind the cluster which are held in by sheet metal screws.


Since most of the other components that connect to the harness have already been removed, this is just a matter of wiggling the wires loose.


I am probably going to replace the wiring harness, but in any case it is good practice to label as many connectors as possible, as this will make the re-install much more straightforward.


The dash area is now looking very bare, with just the steering column and clutch mechanism still in situ.


The under-hood wiring harness was next on the to-go list - removal is a little bit more involved, but is really just a case of undoing or removing the plastic hold-in clips below the radiator and feeding the wires through the holes in the bodywork. Again, it is an excellent idea to label every part of the harness, even if it is probably going to be replaced later.


The next victim was the radiator, which is held in by four bolts.


The fan is held on by four bolts - it is extremely unlikely that the weeny stock fan will be going back in.


Like so much of the car below the surface, the pulley behind the fan was caked in a thick layer of baked on grime which has been building up for many years.


I plugged up the radiator hose inlet and outlet with a couple of old champagne corks. At this point I'm hoping to do most of the work I need to do under the hood without pulling the motor - we'll see how successful this plan is in due course.