Wednesday, April 28, 2010

dust in the sun

I popped out to the garage at tea time to take a few picks of the car in the sunshine. I am still hoping to have the tear down complete before the INDY 500 at the end of May. Right now I need to buy a steering wheel puller and get the rest of the dash out of the car.

Tuesday, April 27, 2010

Mustangs Plus

I took a break from working on the car at the weekend and joined other members of BAMA to head out to the Mustangs Plus show in Stockton. Maybe my car will make it out there one of these days?


Sunday, April 18, 2010

more cleaning

I haven't had much time to work on the car this weekend - the weather has been too nice to be stuck in the garage. I spent a little bit of time tinkering on saturday morning. I have mainly been cleaning up some of the parts I took off the car last week. The rear quarter windows came out nice - I just need to add a new set of gaskets to the parts needed list.


The frames for the rear quarter windows were one of the most fiddly parts I have cleaned so far.


The only things left in the interior now are the dash pad, steering wheel/column and the headliner. My next task is to find somewhere to store the windshield and backlite and then take them out.


I am still hoping to finish the tear-down and clean up the body before the INDY 500 at the end of next month.

Thursday, April 15, 2010

out with the windows

I've been working on taking out the windows this week. Progress has been slow as I've been limited to tinkering with the car in the evenings. I was a bit apprehensive about taking the windows out: so far I haven't unbolted anything I don't think I can put back....but the windows? Well, I guess if you can get something apart, you can get it back together again...The rear window on the passenger side never did go up and down, so I figured this was the place to start.


This turned out to be a good place to start, because the winding mechanism is relatively simple and was easy to remove. I started by taking out the bolts which secure the winding mechanism. 


One of the brackets which appears to act as a stop was bent inwards (the one on the left, below). This must have taken a heck of a hit to bend a piece of steel this thick - another pointer towards side impact damage to go with the replacement door on that side. No wonder this window never worked! (The undamaged bracket on the right came out of the driver's side rear window assembly).


I tried to take as many pictures of the components as I could, but I am far from certain I will ever get all this stuff back together....


I inspected the interior of the window housing for rust. It was not much to worry about on the passenger side.


Even at the juncture of the wheel arch and exterior panel the corrosion may be traetable without patching.


The rear of the car is mostly stripped out. I am leaving the backlite in place until I have some safe place to store the glass. The backlite on my car looks original and is in good shape. The windshield may have to be replaced though, as it has several large chips and a lot of scratches.


Getting the main side windows out was a bit of a trauma, but I accomplished it eventually, mainly due to this excellent blog


The drivers side was much easier - isn't everything the second time round?


Both side windows were in great shape and will be going back...if I can ever work out how to put the bits together again!


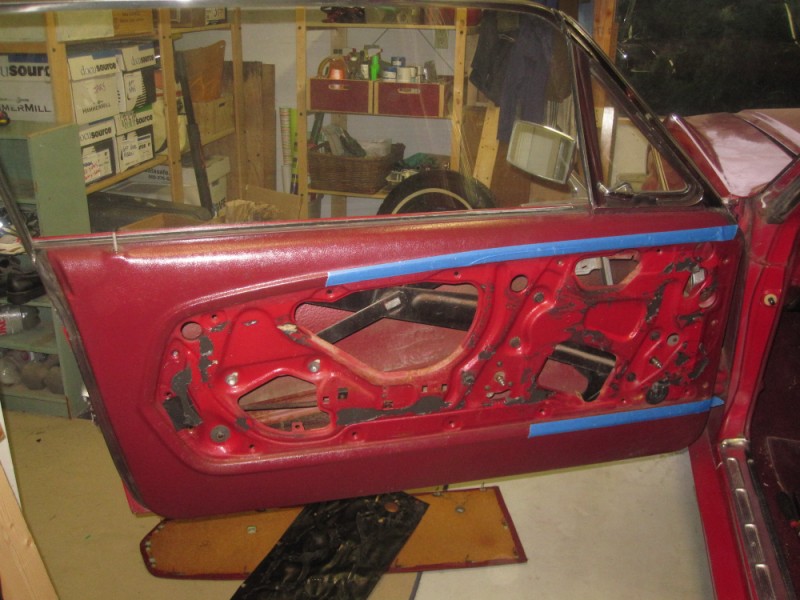
More over-spray, this time on the passenger window - unsurprising since this door/window was white when it came from the factory.


Last thing out was the lock/latch mechanism.


The drivers side components were in better shape; I hope to reuse most of these parts.


Now the doors wont stay closed on their own!

Thursday, April 8, 2010

down on the doors

Taking the interior apart has been a lot of fun. Most of the interior trim is in pretty good condition and I am planning to put almost all of it back later.


I used some tape to prevent scratches when I removed the inner door panels. A piece of cloth would probably be better.


I suspected that the passenger door was a ringer, and it was confirmed when I took off the vapor barrier and discovered....it used to be black !


Like so many things in life, once you learn a new fact, you can find lots of other things that might have hinted at it. Red over-spray on the inside of the latch button and a black ring around the hole now make so much more sense.


There are some pretty obvious signs that the door has been repainted at the rear edge... 


Once the first piece of trim was removed, it was confirmed.


The interior door panels are in great shape and will definitely be going back later.


Both panels have the date JAN 25 1968 stamped on the back - this would fit with a car produced in March 1968.


I'm keeping the vapor barriers for now as they are good enough to put back.


Getting the door handles off is a bit tricky. You have to remove a very small spring clip which retains the bar shown below. It is a good idea to sweep the floor before you try and remove this clip, as that is probably where you will be searching for it.


Yet another part covered in red over-spray.


This is how the drivers door look: all red basically, with a slight color variation where the handle has been.The white marks are bits of old polish.


The other side is going to be much more work. The layers of red paint are as thick as eggshell; you can almost pick it off with your finger nail. This door is also slightly more rusted than the drivers side. 


The clips mounting clips for the interior door handles are very slightly different for each door. This tiny quirk in the production process can sometime help when dating parts, although I have no idea what, if anything, can be inferred in this case.