Sunday, October 30, 2011

le mans green

If you've read the priors page you may already be familiar with my father's 1973 Le Mans Green Ford Consul - a car that is most definitely worthy of further discussion. Strictly speaking, the car was a small-engined British Granada, but strangely Ford chose to revive the name "Consul" to identify the scaled-down version for the first three years of production. The Consul badge had been applied to the four cylinder base model of the Zephyr range from 1951, and, following the 1962 re-style, to its own four car range. This latter series comprised the Consul Classic, Consul Capri, Consul Corsair and Consul Cortina, none of which survived beyond 1964. The c-word was dropped for the final time in 1975, with all subsequent models reverting to the Granada badge.


Our Consul came with the 2495 cc (152 ci) Essex V6 power unit - this motor was produced in the UK at the Ford plant in Dagenham, Essex, and is not to be confused with the Canadian Essex V6 built at the Essex Engine Plant in Windsor, Ontario.  Ford also offered the modded-out Consul L, and a performance GT package which included the larger 2994 cc Essex V6 and boasted 138 bhp. Since the Consul was less well equipped than the similarly powered Granada it was approximately 1 cwt lighter - and MUCH quicker off the line. My father always claimed the car was "built to cruise at 90 mph" but it never went near that speed while I was a passenger.


Of course the most significant feature of the car was the special order paint: Ford called this exceptionally bright shade Le Mans Green (paint code M in 1972-3), in honor of their GT40's decimation of the Ferrari challenge at the famous 24 hours endurance race for four consecutive years from 1966. The choice of color was actually influenced by a similar though darker colored Lotus once spotted in Hull.  When my father ordered the car at Dees of Croydon in early 1973, even the sales manager asked if sir was "quite sure about the color?" After the dealership took delivery the manager made some additional comments about the paint's stunning glow putting his staff "off their lunches"!


In addition to the paint, the car was ordered with several other options including power brakes, wider wheels (plus one inch from stock), radio/cassette delete, nylon inserts sewn into the otherwise vinyl seats, and...wait for it...a sun roof! If the color didn't make the car a one of one then the sunroof surely did. The back up lights were aftermarket lenses over a couple of bulbs plugged straight into the stock wiring harness and were added by a family friend. Dad made up for the lack of a radio by installing an aftermarket cassette player and one speaker which only ever played Stevie Wonder, but the one option the car really could have done with was power steering.


In the fifteen or so years that my family owned the Consul, we never saw another one with the same paint job. My father once said it was a young man's color on a family car, and that's probably fair comment because there were a few Le Mans green Escorts on the street back then; mostly not as nice as the example below it has to be said. This picture actually gives a better idea of what the original color was really like - the other pictures are scanned slides which have faded with age...but then haven't we all.


The Consul was sold for 85 quid around 1988 to be used for banger racing - at the time we we glad to see it go since it had become terribly unreliable - in fact my father had nicknamed the car the "green heap". Of course the car has never been forgotten - even by Ford, who revived the Le Mans Green name in 2009 for a special edition Focus...not exactly the same color, but still cool:


Recently I've been trying to find pictures of other Le Mans Green cars, but when it comes to the Consul I can only find pictures of a model - with the GT fog lamps and a black sports roof...the more sporty cars in the Ford range are a little bit easier to track down.

Model of Consul GT with sports roof
Mark I Ford Capri
70's Ford Cortina
70's Ford Escort

Wednesday, October 19, 2011

engine compartment part four

Phew, finally all cleaned up and ready for masking and then epoxy. This is a landmark moment since it is the last bit of bodywork to get the wire wheel treatment....and also the last bit that I'll be able to get away without block sanding. Just before launching into the final pre-primer clean up I used a trick I learned from a mate in BAMA to get all the dust out of the garage. It doesn't take much imagination to picture the thick layer of grinding dust that was covering everything in the shop after wire wheeling for weekends-on-end, and I didn't want it all getting mixed up with the primer....so I borrowed my buddies high powered fan and set it up in the doorway at the side of the garage...next I fired up my compressor and blew down everything in the shop. The fan did a magnificent job of sucking all the dust out of the garage....and into my neighbors yard (oops!).


Started closing off the firewall, and then the rest of the passenger compartment.


Closed off the front and sides, and then moved on to the rear window and trunk opening.


I put some paper down under the jack stands this time - I usually cover the floor with dust sheets or polythene, and I always end with paint under the stands....


I wasn't bothered about getting overspray on the roof or quarter panels because these parts will be getting stripped next, but I covered up with some old sheets anyway. I ran all the dust sheets through the laundry first to get rid of any extra dust, but mostly I covered up the garage with disposable plastic sheeting which catches a LOT of the overspray.


Finally time to mix up some primer and break out the spray gun. Everywhere got two coats of PPG epoxy primer with about 30 minutes flash time in between coats, including the transmission tunnel and most of the underside where the previous primer was damaged. Next morning I applied fresh caulking in accordance with the diagram in Ford's Weld and Sealant manual. I spent a lot of time making sure the sealer at the top of the firewall was as neat as I could possibly get it as this will actually be seen when the car is finished...everywhere else got a 3/8ths bead straight from the tube and that was it.


Maneuvering my paint gun inside the engine bay was actually quite a challenge, so while the sealer was curing I went out and acquired a touch-up gun. It took a bit of messing around before I got the new gun dialed in, and then I gave everywhere another two coats of epoxy, paying particular attention to the new sealer. I painted the smaller parts right at the end to use up the last bit of primer, and then it was time to let the dust settle before tidying up.

Tuesday, October 4, 2011

engine compartment part three

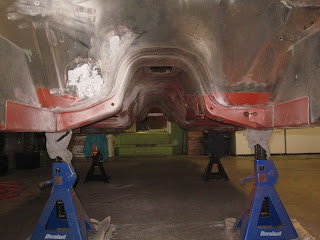
Usually when I get done with a batch of grinding I expect to be spraying epoxy within a couple of hours, but I've learned that the final cleanup and pre-painting prep is a major task in itself. So, with the engine compartment down to bare metal, the only thing left to clean up was the transmission tunnel. This is the legacy of painting the underside of the car without removing the drive line (it made sense at the time...). Here's the view just before I started working on the engine bay:


I also had some repairs to do below the seat risers - I made a bit of a mess cutting out the original platforms, and then when I welded them back in after modifications the primer was burned off - I tidied up with some body filler and a wire cup on the drill. Areas where the epoxy wasn't damaged were scuffed up with some sandpaper in preparation for another coat of primer.


I had to do some more work with the body filler at the toe boards and at the heater motor opening in the firewall - basically everywhere that I previously patched the bodywork needed a bit of massaging. I also filled in a few imperfections at the top of the shock towers: I put too much work into these areas to leave them less than 100%.


Then it was on to the cowl. Obviously I didn't want to use the wire wheel anywhere on the outer bodywork, so I broke out the aircraft stripper once more, after masking off the air vents.


I really didn't want a bunch of paint stripper swilling around inside the cowl, so I tried scraping the paint off the air vents with a razor blade.


I got as far as I could with the razor blade...and then my Dad showed up for his Fall vacation and made a really good job of it.


When I go to the trouble of getting the paint gun out, I like to have a few extra items ready to go so that I can use up any paint leftover from the main job. Right before the wire wheel was packed away I picked out a bunch of parts from the engine bay and the front end that I want to paint black. I got the worst of the rust and old paint off with the DeWalt, and then I took the parts over to my buddy Chuck's shop and finished them up in the blast cabinet.