Showing posts with label trunk. Show all posts

Monday, October 5, 2015

interior round-up

Most of the work described in this post was done at the old garage in preparation for the move - essentially I had to put the seats back in before I could move, and while I'll have to take them back out at some point to restore them (and install the carpet), I wanted to make sure all the surrounding areas were buttoned up.

Now then, now then: if you're going to drive around in a vintage car, then you have to accept some compromises on safety. I'm fortunate that 68 was the first year that ford replaced the "spear" steering column with a collapsible design and made a number of other modifications to improve safety, such as the rear side marker lights. In addition I've made my own improvements such as the SSBC brakes and 3-point seat belts (see below).

Given what we know about gasoline, it's always surprised me that the gas tank (also known as the trunk floor) is separated from the passenger compartment by nothing more than a flimsy sheet of cardboard and the rear seat back. A common modification among the guys in BAMA is to install a steel or aluminum sheet instead. I followed this path after my buddy Chuck acquired a suitable obsolete steel sign, which I trimmed, covered with faux-dynamat at the trunk side, and installed with sheet metal screws.
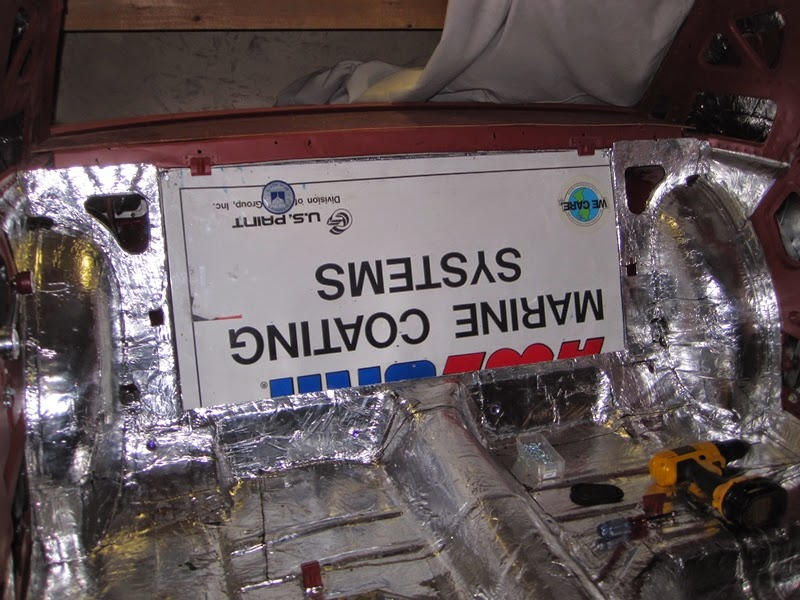
Much safer!

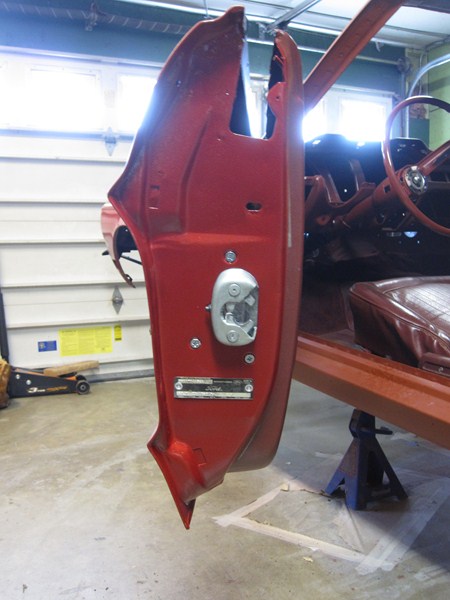
Absolutely forever ago (when I had the old garage set up as a paint booth) the rear seat side panels were stripped down, and repainted. I had to remove some light surface rust on the inside, and I scrubbed off all the remnants of the old foam sound insulation.


After painting, thick foam insulation was glued onto the insides of the panels with the 3M yellow weatherstrip adhesive (but not photographed) and the Kraft vapor barriers installed using windshield caulk to provide a seal. To be honest it was really hard to squirt sticky black paste over my beautiful car...but I found a way. After the panels were installed I attached the window winders, and tested the quarter windows....and applied my BAMA decal in the passenger quarter window.


Another improved safety feature of the 68 over the earlier cars was shoulder belts as well as lap belts for the front seats. This means that installing 3-point seat belts in a 68 is a good deal easier than in the preceding cars because the upper mounting point is already there. I actually purchased the seat belt kit more than two years ago, because I wanted to test all the mounting points before I put away the welder.


After I Moved to the present garage I found the seat belts while looking for something else, so I took ten minutes out to installed them. The lap belts in the rear seat are for show. This will be a two-seater car when it's on the road.

Wednesday, October 30, 2013

trunk springs...again

Now then, now then, safety first: taking the trunk hinge torsion springs in and out is a dangerous operation which has been known to result in the loss of fingers. I've written before about how to do this safety, and I've given away the plans to a very useful tool I made for the purpose. In fact, I thought I was done with this operation after my last house move.


But no. And this little story is a peach. So I got a bit carried away with the zinc plating and through in everything I could...including the trunk springs. What I didn't know when I did this (although I should have given my history in organometallic chemist!) was that hydrogen starvation in the plating process weakens the springs. Months after I moved, I went to open up the trunk and discovered both springs had snapped. Oh dear. I mentioned in my last post that I snaffled a bunch of parts from my friends at Mostly Mustangs, and the trunk springs were the first thing I grabbed. This time though I just cleaned them up and painted them gray. I had to wait until I turned the car around before I could get the room to work on the trunk. After that the installation was easy. It should be...I've done it enough times now.


I took the gas tank back out and used the trunk access to get the deck lid perfectly aligned. This took rather a lot of rinse and repeat to get the lid spot on. When I was finally satisfied, I drilled some 1/8" dia. alignment holes through the hinges. Next time I take the lid off, putting it back right should be much easier.


I caulked the seal at the gas tank and installed all the bolts. I was careful not to use too much caulk after the trauma I had taking the tank out the first time. I also re-installed the filler neck and most of the flip-top gas cap (more on that later).


I wanted to install the rear bumper and license plate while I had access to the back of the bar, but I couldn't get the passenger side bumper support to fit around the rear valance. I'd actually forgotten that before I owned the 68 it had been taken some minor damage at the rear. This involved some re-working of the rear valance and a few other things, but I guess I never noticed that one of the bumper supports was also bent. When I compared the two brackets through, it was obvious. Not exactly the most difficult repair to make - I just put the bracket in the vice and leaned on it, but I was happy to do this before the final paint had been applied. I guess this is why you do a dry build!


While all this was going on, preparations for the enigne rebuild were still ticking over. All the rusty hardware got soaked in Marine Clean, worked over with the wire wheel, and zinc plated.

 
Turned out nice!
A few other things also got the zinc treatment

Friday, October 19, 2012

putting on some weight

So before I could go any further with installing the front end, I needed to put some more weight on the car. The doors had to go back on at some point so it made sense to start there. But just at the last minute I remembered that it was much easier to get the seats in and out when the doors were off, so I put the interior and the steering column back in first.

bolted on my zinc plated door hinges
and the latch bar
also installed the refurbished fender support brackets
quick pause to throw in the seats...
loose carpet and the steering column went back too (yet again...)

So now back to the doors. I did a full refurbishment of the doors a while back - in my previous garage in fact, here and here. But that's not all. Back when I shot base coat/clear coat on the trunk and gas tank with their final red, I also painted the door edges (more on this later).

interior side was previously painted maroon
masked that off...
sprayed on the bc/cc
finished door

I would have liked to have taken the time to reinstall all the side glass, but by this stage I was in too much of a hurry to get packed and move, so I bolted on the doors with the minimum amount of fuss.

laid down a bunch of tape to protect my new paint work
secured the door at the latch end
crude but effective alignment strategy
reinstalled the latch and the VIN tag using correct style push-in rivets

Next up: the trunk lid, starting with my zinc plated hinges.

bling, bling!

I described the dangerous procedure for installing the hinge springs here, and I don't have much to add...except that this time I broke my homemade tool. This set me back an hour while I made a stronger replacement out of quarter inch thick angle.

broken prototype
stronger mark II version

I used my usual in-through-the-gas-tank-opening approach to align the trunk lid and then dropped in the finished gas tank. Then it was back to packing up more stuff in time for moving.

Sunday, July 15, 2012

into the red

What color to paint your car? It's a tough question, in fact one of my friends from BAMA agonized for two years before settling on the merlot jewel metallic paint job you can see below for his 65 fastback. For me it was a decision I made before I bought my car: I was never intending to repaint (or restore...) the car originally, so I chose what I wanted and bought that car. However, when you have everything back in primer, it's tempting to think about alternatives. I considered for a while changing the shade of red to something lighter or more orange, but that probably wouldn't have worked so well with the maroon interior, so I've decided I'm sticking with the original Ford Candy Apple Red (note: this is a solid color and not a candy-style paint job). The one thing that will be going though is the naff white roof my car had when I acquired it.


I'm still not decided on whether I'll be painting the entire car myself, although I'm leaning towards it, but I will be doing the jambs, underside of the hood and deck lid, and inside the trunk. I mentioned in my last post about how converting my garage into a paint booth takes a lot of effort, so I decided I would do a bit more than just the epoxy primer. I picked the trunk as my starting point because I wanted to have a go at spraying urethane base coat/clear coat somewhere where it doesn't matter - most of the trunk will be covered up with mats, spare wheel etc, so I couldn't really go wrong. A lot of the car was already masked off from painting over the new body work so I just had to expose the trunk and seal it off from the rest of the car.


It doesn't show that well in the pictures, but before I started painting I scuffed up the trunk real good with a scotchbrite and wiped down with denatured alcohol. Then I laid down a thin coat of PPG DP74LF red oxide epoxy primer which I mixed 2:1 with DP401LF activator as usual and then added one part of acetone (so a 2:1:1 overall ratio). While the primer was flashing I mixed up the urethane base coat: I used PPG DBC "K" Color to which I added DT870 medium reducer in a 1:1 ratio. I sprayed on two coats with a 45 minute flash time. I followed up with two coats of urethane clear made up of four parts of DCU2021 with  one part DT870 reducer and one part DCX61 urethane hardener (4:1:1). It came out really well with just a few (mostly inconspicuous I hope) runs.


At the same time I did a bit of work on the gas tank. Started by masking off the top side:


Then I scuffed up the underside and sprayed on a very thin layer of epoxy primer and two coats of clear coat. This look will match the underside of the car.


I let the clear coat harden overnight and then masked it off before scuffing up the topside/trunk floor.


The top side got the red base coat as well as the clear because I want it to match the trunk, even though it will be mostly covered up. This came out really nice without any runs. So happy with my choice of color!