 |
| Crusty rust around the inner lip of the roof |
I did what I could to sand off the surface rust around the inner lip*. I also scuffed up the underside of the roof - although most of this area was rust free, it was covered with residue from the adhesive used to stick on the roof insulation (*actually, my Dad did the sanding when he was helping out one day while I worked on something else).
The whole area around the edge of the roof then got a good going over with Zero Rust which I applied with a small foam brush - this was perfect for getting a good amount of paint into the tight space.
The roof looked rather odd with a painted strip around the perimeter. I know it really doesn't matter what it looks like as the headliner will cover it all up, but I just couldn't leave it like that...so I painted Zero Rust over the entire underside of the roof - I can't do any harm, and the worse that can happen is that it will peel off. I'm probably two years or more away from installing the new headliner, so I should know by then (!)
The situation inside the C-pillar was similar to the edges of the roof - plenty of surface rust, and very difficult to get at it, even with sandpaper. I did as much as I could, but ultimately had to accept that some parts of the bodywork are just inaccessible.
The inside of the C-pillar then got the Zero Rust treatment too...as far as was possible.
Next up was the inside of the quarter panel (is there a better name for this area?). Adhesive from the vapor barrier was plastered all over the outer panel...
...but this came off quite easily with some lacquer thinner on a shop towel - this method does remove some surface paint, so bear that in mind if you're going to use it. I also hand sanded as much of the surface rust inside the panel as I could get at. I used an eighteen inch piece of garden hose attached to my shop vac to clean up inside the opening.
I was planning to deal with the surface rust inside the quarter panel next, but I got sidetracked by the corrosion on the wheel arch. I went over this area with a 4.5 inch wire wheel on my angle grinder, and got most of the rust off, but the underlying metal is pockmarked.
At this stage I got a bit carried away with the grinding wheel. It was always the plan to take off the seam sealer, as most of it was cracked and loose anyway and there was even some light rust underneath in places...and I just carried on going with the wire wheel until quite a large area of the floor pan was cleaned up. Then I had to clean up inside the quarter panel for a second time...
...before I could apply the Zero Rust everywhere I could get to inside the panel. It's a good idea to wear long sleeves while doing this - I just had a t-shirt on, and by the time I was done there was as much paint up my arm as there was on the car.
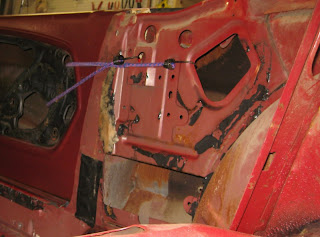
Here's a shot from inside the panel after the paint dried. This one is looking down from the quarter window opening towards the rear of the car.
The next picture is looking down and towards the front of the car. Pretty good coverage I think.
The driver side was in similar shape...
Before attacking the rust, I wanted to remove the driver door strike plate. I got the passenger side off with a #4 Philips screwdriver and plenty of liquid wrench, but this time the bolts were rusted solid - after squirting on liquid wrench every day for a week, I gave up and drilled out the bolts. This was a lot tougher than it sounds, and I destroyed a 7/64 ths drill bit in the process, but...eventually...I won.
The residual pieces of bolt thread were removed from the captive nuts by running a tap drenched in cutting fluid through the holes. Fortunately I didn't do any damage to the thread with the drill - I know because I tried putting the strike plate back on with the bolts from the other side of the car and it worked fine. Now I just need to find some replacement bolts...what's the betting I end up buying a new strike plate too?
 |
| Drilling out the bolts produced a satisfying pile of metal filings |
Here's the "before" shot of the driver side inner quarter panel...plenty of rust here.
It's hard to see in the above photo, but there is a hole close to the wheel arch. Really I should have dealt with this issue before cleaning up the inside of the panel, but my welding skills are not up to a job like this just yet, so it's on the "come back to list" until I get some more practice with the MIG.
The "after" picture taken once the inside of the panel and the C-pillar had been hand sanded as far as possible and a coat of Zero Rust applied.
 |
| Yes, that is a rare turn signal hood in the background. |


Looks great!
ReplyDeleteNice thorough job! First time I've heard of "zero rust". I love the red oxide color of it. I'll have to check that out when I get to that point on my fastback.
ReplyDelete