

Cleaning the front half of the underside was reasonably straightforward as the floor is mostly level, but the rear half was much more involved due to all the little nooks in the sheet metal. There were still quite a few areas that needed wire wheeling, so I masked off the clean portion before I got stuck into the second half.

I used a selection of smaller wire wheels on my new die grinder. This was the first time I really used my new compressor to work on the car, and I found it very adequate. The tank is 25 gallons, so there is no shortage of "power" through the various air tools...but it is really LOUD when it's running...because my garage is on the top of the building you can hear the compressor's thunderous vibrations throughout the house.
In this way I dealt with virtually everything - what was left was attacked by hand with a wire brush. I didn't get it 100% perfect, but as my father would say when working on projects around the house, "a blind man would be glad to see it." This little phrase was trotted out umpteen times while I was growing up whenever things didn't come out perfectly!

The only places where I couldn't completely remove the surface rust were the rear sides of the two front torque boxes. I hit both with a good coating of zero rust which I applied with a small foam brush. There is an access hole in the driver side torque box to accommodate the fuel line. I decided it would be a good idea to blow out the void inside with some compressed air...

The picture below shows what was inside after I swept up the floor. I have to admit I was astonished by how much dirt and grit came out. This was my cue to blow air into every opening I could find in the floor pan or frame rails. I had a VERY dusty garage when I was done!

After sweeping up the dust, I completed the cleaning up of the underside to my satisfaction by going over the entire area with a paper towel soaked in acetone. This operation was enough to wipe out my forearms for the next two days. I then went over the whole area with metal prep, rinsed the residue off with a sponge and a lot of water and dried the car with compressed air. All in all this was a real work out. The next day I started masking off the bits I didn't want to paint, starting with the transmission.

Inside the car every bolt hole and access opening was taped over.

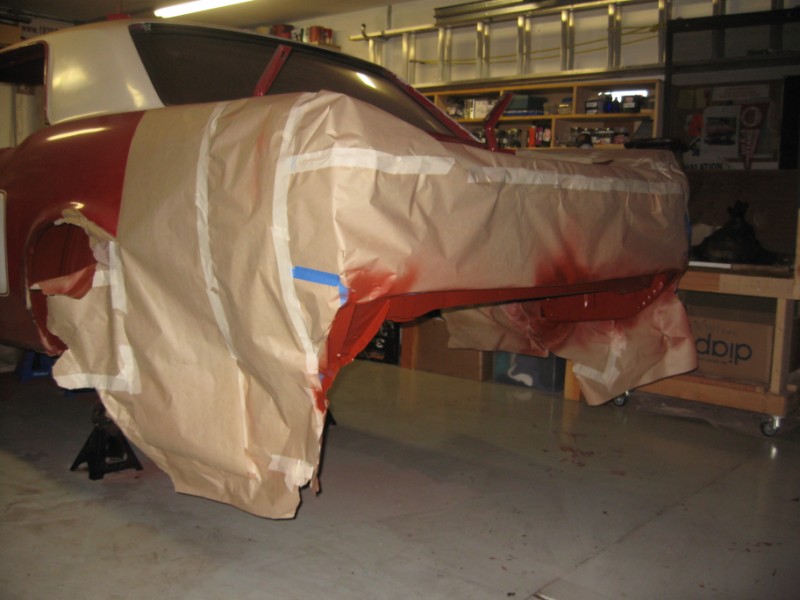
In the trunk area I had a chance to practice the masking method I got from Larry Lyles. I started by carefully applying tape around the edges of the opening exactly where I wanted the edge of the paint to be (I try to use the blue decorators tape when applying tape directly onto the bodywork as it is less likely to remove any paint and/or leave a mess later). I then assembled a grid of wider pieces of masking tape with the sticky side down:

Masking paper is then pressed onto the tape from below. It is best to cut the masking paper slightly too small, and then add more tape at the edges from below the opening. This results in a very strong masked barrier: if it gets poked or prodded during the painting it's not going to rip. It took me two hours of taping to completely mask the car - this was actually one of the most fun parts of the process.

I have never painted a car before, and don't even really have that much experience of "rattle" cans. I knew I needed to do a lot of research before buying a gun - I am somewhat limited by my paltry 25 gal. compressor, so most of the HVLP guns are out...I was asking around in BAMA for some help and...well...basically Larry S. told me not to bother buying a gun at all, but to use his instead. Larry also gave me a lot of advice on how to do the painting which all proved invaluable. The gun I used was the gravity feed type with the paint cup below the trigger (the cup-on-top guns are never going to work under the car!). I ran the gun at approx 90 psi...and it was amazing! Like using the power of 15 rattle cans at the same time.
I also researched the types of paint available, and decided on PPG epoxy primer. This was a big decision, as I'll have to stick with it for the whole car, but after doing the painting I'm happy with my choice. I actually used one quart of PPG DP74LF red oxide, which I mixed 2:1 with PPG DP401LF activator and about 20ml of acetone. When the paint was all mixed up I strained it, loaded up the gun and went for it. I actually had about a third of the paint left over, which I had to toss. Next time I will have a bunch of parts ready to prime with any leftover paint. This is the result around the gas tank opening:

The area behind the rear valance was tough to mask around; I just decided more is better in this area, and then covered the rest of the car with dust sheets, which were removed before this picture was taken:
A bit of paint on the jack stands is actually a good thing - it shows they've been properly used!

Overall, applying the paint took about an hour. Quite a bit of this time was taken up with positioning the gun, due to all the surface contours. It took less than five minutes to peel off all the masking paper the next day.

I have to say I am delighted with the results. There are one or two tiny patches where the paint is a little bit light, but it is 99% okay with very few drips. For my first time loose with a paint gun I am really happy with how it came out. A huge milestone has been reached...plus no more crawling under the car, for a while!

That looks great! Keep up the great work and blog.
ReplyDeleteThere's nothing like a freshly painted undercarriage. Awesome job there.
ReplyDelete