I'm really fortunate to have a large west-facing window in my garage; I always catch the early evening sunshine, and I am often in the garage at this time.
Today I noticed how the sunlight was coming through the radiator and making some cool patterns on parts on
the engine.
I took this one a little bit later; two of the trees behind my house are casting their shadow over the driver's side fender. This is probably my favorite picture of the car at the moment.
Thursday, May 20, 2010
Wednesday, May 19, 2010
bye bye ugly ac
Progress has been a bit slow lately for a number of reasons. For one thing, I was waiting to remove the air conditioning unit until I researched how to do it properly. Everyone I asked for advice told me to leave the ac in the car and work around it...no one seemed to get that the thing is a late 70's aftermarket unit and doesn't add all that much value to the car...mainly because it is DOG UGLY! Honestly, it had to go!
After taking in the advice on VMF, I had a guy come out and discharge the system for me, as I didn't really want to get busted for flooding the garage with CFC's. Sadly for me, the system was charged with R134, so I even had to pay $$$. Once that was done, it was a piece of cake to get the unit out.
Next was the cooler - I was really glad to see the back of this. At last no more questions about my "aluminum radiator"!
There were a TON of dead bugs entombed in the front of the radiator, including a couple of particularly gross specimens, which I decided not to post here...probably just as well.
The next target was the heater, which is essentially held in by four bolts through the firewall, and a couple of other fasteners under the dash.
Once these bolts are out, it's a question of wiggling the unit a little bit to free it up, and then disconnecting the hoses (of course it goes without saying that I drained the radiator first). Then you have to undo the cables which connect the control levers on the left of the steering wheel. I suspect this is going to be a real PITA to put back later.
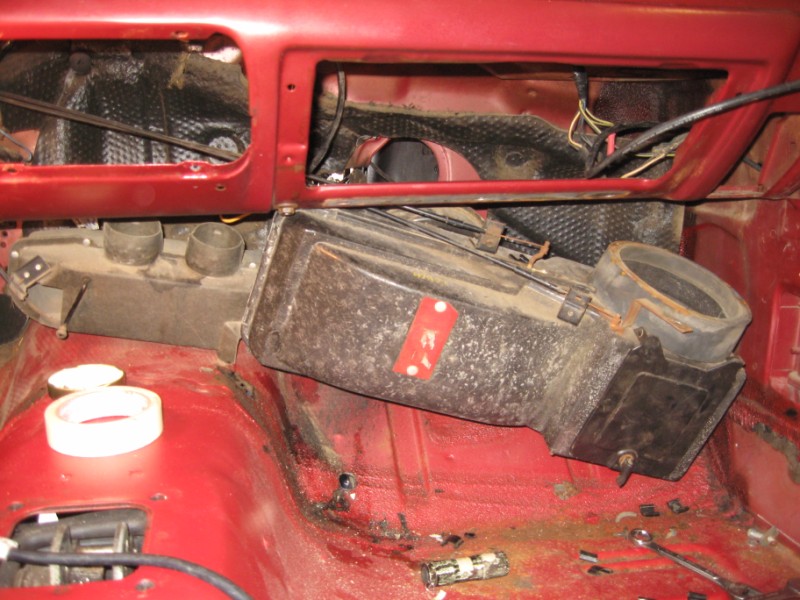
The heater unit housing was full of dead leaves! I guess it could have been worse; the whole thing was filthy inside and out.
All the foam inside the heater has turned to dust - and fair enough after 40 odd years. All this will have to be replaced if/when the heater goes back in.
The area behind the dash really is starting to look bare now. I'm still hoping to complete the rest of the tear down before we leave for Indiana, but as I have only one more weekend, it may not all get done.
After taking in the advice on VMF, I had a guy come out and discharge the system for me, as I didn't really want to get busted for flooding the garage with CFC's. Sadly for me, the system was charged with R134, so I even had to pay $$$. Once that was done, it was a piece of cake to get the unit out.
Next was the cooler - I was really glad to see the back of this. At last no more questions about my "aluminum radiator"!
There were a TON of dead bugs entombed in the front of the radiator, including a couple of particularly gross specimens, which I decided not to post here...probably just as well.
The next target was the heater, which is essentially held in by four bolts through the firewall, and a couple of other fasteners under the dash.
Once these bolts are out, it's a question of wiggling the unit a little bit to free it up, and then disconnecting the hoses (of course it goes without saying that I drained the radiator first). Then you have to undo the cables which connect the control levers on the left of the steering wheel. I suspect this is going to be a real PITA to put back later.
The heater unit housing was full of dead leaves! I guess it could have been worse; the whole thing was filthy inside and out.
All the foam inside the heater has turned to dust - and fair enough after 40 odd years. All this will have to be replaced if/when the heater goes back in.
The area behind the dash really is starting to look bare now. I'm still hoping to complete the rest of the tear down before we leave for Indiana, but as I have only one more weekend, it may not all get done.
Sunday, May 2, 2010
pulling the wheel
Sam and I went to the Pleasant Hill mall on Saturday to pick up some new toys: I got a steering wheel puller and #4 Philips screwdriver from Sears and Sam picked up some goodies from the Disney Store. I had to go back to the store this morning to get some 5/16"-24 bolts to fit the wheel puller (none of the selection in the kit was the right size...of course I should have sized the bolts I needed before I went out the first time. Doh!). Then I had to file out the wheel puller to make it fit. When I eventually got it set up, I pulled the wheel in like two seconds.
The red steering wheel is one of the few parts that is not currently reproduced, as far as I can tell. This one is in almost perfect condition and will absolutely definitely be going back later.
After much faffing about I eventually got the instrument cluster loose, and managed to remove the dash pad.
I have no idea what kind of stereo I am going to put in, but it will be an upgrade on the single stock speaker!
To get the cluster out, you have to remove the 5/8" nut connecting the speedo cable - mine was only finger tight (nut to the right of blue tape). The wiring harness can then be disconnected and the cluster is free.
I want to maintain the stock look of the interior as much as possible, so the original gauge cluster will be going straight back later. I'm going to take an "if it aint broke..." attitude to the cluster as it was all working before I removed it.
The interior is now looking rather bare. There's not a whole lot more to take out before I can start on the bodywork. I am leaving the hood and fenders on the car for now as I don't have anywhere to store them.
The red steering wheel is one of the few parts that is not currently reproduced, as far as I can tell. This one is in almost perfect condition and will absolutely definitely be going back later.
After much faffing about I eventually got the instrument cluster loose, and managed to remove the dash pad.
I have no idea what kind of stereo I am going to put in, but it will be an upgrade on the single stock speaker!
To get the cluster out, you have to remove the 5/8" nut connecting the speedo cable - mine was only finger tight (nut to the right of blue tape). The wiring harness can then be disconnected and the cluster is free.
I want to maintain the stock look of the interior as much as possible, so the original gauge cluster will be going straight back later. I'm going to take an "if it aint broke..." attitude to the cluster as it was all working before I removed it.
The interior is now looking rather bare. There's not a whole lot more to take out before I can start on the bodywork. I am leaving the hood and fenders on the car for now as I don't have anywhere to store them.
Subscribe to:
Posts (Atom)