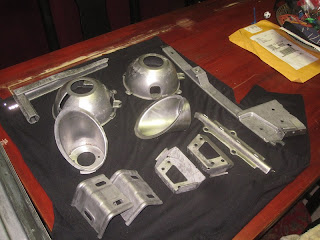
Once I was happy with the magic rust removal solution (ie exactly one day after I started using it!) I spent a while collecting together every small part that could possibly benefit from treatment....and then systematically soaked everything in batches. While this was going on I also stripped the old paint off of some of the other small parts that I was planning to refinish. It wasn't long before I had a growing pile of pristine, original parts.
I converted my garden shed into a spray booth so that I could get the nice shinny parts painted as quickly as possible. Anything that originally had the appearance of bare metal got painted with my favorite Eastwood Brake Gray over a light coat of etching primer.
 |
| finished marker light brackets |
 |
| floor plugs |
I decided it would be most time efficient to refurbish a few parts that I'm not even 100% sure I'll be reusing (like the fuel line attaching bracket, below) while I had my Production Facilities/Paint Booth fully operational, rather than coming back to this stuff later on.
By this time I was accumulating another large pile of empty rattle cans in the shed.
The black parts got hit with at least two coats of the same Duplicolor paint I used on the engine compartment.
 |
| window winding mechanism thing (!) |
 |
| clutch and brake pedals |
 |
| horns |
 |
| brackets from somewhere inside the door |
 |
| headlamp inner buckets |
 |
| Most of the shed was black too by this point... |
I painted the tail light buckets with some chrome-look paint on the outside, and then I used some duplicolor brilliant white on the inside - this took a lot of masking and re-masking to achieve, but the white is much better for reflecting light than chrome or gray would be. At this point I have finished pretty much all of the small parts that will have a paint finish - so in other words the garage is still stacked full of boxes of parts, but now more than half of them are ready to go back :)


Wow! Very nice job. I'll be remembering your process down the road when I get to those small pieces-parts.
ReplyDeleteWow, you make me sorry that I spent so much time with my blast cabinet. Chelation kicks a**!
ReplyDeleteNice painting there too, btw.
Thanks Alex...if I had a blast cabinet/decent compressor, I probably would have used that too, may even have bought one...but thanks to Sven I didn't have to :)
DeleteNIce work! Saved a lot of money too. And there's nothing like a brand-new original part. Beats a repro anytime.
ReplyDeleteThanks! And agree about repro parts - the whole point of this process was to use as many original parts as possible. And I have ;)
DeleteMan! That is some pro-level work there. Very nice!
ReplyDeleteThank you - couldn't have done it without your input :)
DeleteGreat work there!! I have some parts that I'm gonna restore / re-use. I have some that I've sent off but nothing beats using the original! Nice work!!
ReplyDelete